First and foremost, we cannot recommend strongly enough that users read the documentation on building widgets at the following address: YUI and OpenLayers. Many examples are also available at YUI exemples and OpenLayers exemples. In addition, the community around these 2 libraries is very active, and the forums are also well-stocked with many answers to questions that will be of interest.
This tutorial describes several examples of how to create your own widget. Before you start, make sure that Eclipse is installed on your workstation as well as the Maven module. This will allow you to generate a JAR file that contains your widgets.
Easy Geoweb accepts several JAR files with widgets, but each widget must possess a unique identifier.
A widget is a module that will be dynamically loaded in the portal, and which breaks down into 3 files:
-
fichier XMLto describe the resources needed (javascript, poperties, image) and to define the identification of the module. -
fichier JSto configure the actions and the interactions of the widget with the portal. -
CSSfileto configure the style of the widget.
The set of sources needed to complete this tutorial is supplied with the documentation.
In Eclipse, create a new Maven project.
Choose Create a simple project (skype archetype selection). For this tutorial, the description of the artifact is:
-
Group Id: com.geoconcept.geoweb.product -
Artifact Id: geoweb-easy-widgets-tutorial -
Version: 0.0.1-SNAPSHOT -
Packaging: jar
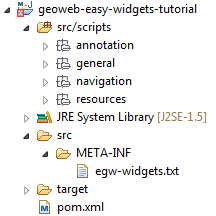
Once the new project has been created, delete the main java class and the test and main directories in src . In the src directory, create a scripts directory with Source folder (right-click on the project, then select New → Source Folder).
Next, create a META-INF directory in src. This will contain the egw-widgets.txt file. Inside this file, it will be necessary to inscribe a character string, for example "easy-geoweb widgets module". This file identifies and filters the JARs so only those that possess widgets are conserved.
The final structure is as follows:
Create 4 new directories under src/scripts:
- general: this will contain the files in the new widgets. This directory will be visible in the designer accordion. There are currently 8 categories/directories available for the designer (Annotation/ /annotation, Information on objects/data, General/general, Page layout/layout, Measures/measure, Data Modifications/modification, Navigation/navigation, View/view). In addition to the General directory, you should add the annotation and navigation directories in order to work the examples.
- resources: this will contain the files of resources (images, localisation, …).
In Resources, create:
- images: this will contain all the images used
- exampleLang.properties: this file contains all the default localisation strings. To add new languages to the widgets, you need to duplicate this file while adding to the name of the desired localisation file. For example, for a French localisation, the file will have to be named exampleLang_fr.properties.
Important note: a widget JAR must ONLY contain files linked to the widgets.
In the file called pom.xml, add the following elements in order to construct the project in JAR format:
<build>
        <plugins>
                <plugin>
                        <groupId>org.apache.maven.plugins</groupId>
                        <artifactId>maven-jar-plugin</artifactId>
                        <configuration>
                                <classesDirectory>src</classesDirectory>
                                <outputDirectory>D:/widgets</outputDirectory>
                                <excludes>
                                        <exclude>**/pom.xml</exclude>
                                </excludes>
                                <archive>
                                        <addMavenDescriptor>false</addMavenDescriptor>
                                </archive>
                        </configuration>
                </plugin>
        </plugins>
</build>
classesDirectory is the access filepath to the widget files.
outputDirectory is the filepath in which the JAR file generated will be placed.
This widget allows you to display the map legend. This will consist of a button type widget. The legend corresponds to an image displayed in a panel.
The widget is called ExampleLegend.
Create the 3 widget files in the general directory:
- ExampleLegend.xml
- ExampleLegend.js
- ExampleLegend.css
This example is the simplest. Here is the configuration file:
<widget id="exampleLegend"
        category="standard"
        position="12"
        icon="resources/images/exampleLegend.png"
        js="general/ExampleLegend.js"
        module="geoconcept-widget-example-legend"
        display="true"
        lang="resources/exampleLang">
</widget>
-
id: unique identifier -
icon: filepath to access the image resource for the display as a button. -
js: filepath to access the configuration file for the widget action. -
module: name of the module that will be called in the widget manager to load the widget instance. -
display: a Boolean to determine whether the widget will be displayed in the designer. Use false to create a sub-widget that will provide functionalities that are common to other widgets. -
lang: access filepath to the localisation file.
For further information, see the description of XML files in the chapter on widgets.
The js file allows you to build a new module. The widget created is a single button, and the action will be executed each time the user will apply pressure on the button. The method called following a mouse-click is trigger:function(). This method is defined in WidgetBase but here it suits our purpose to overload it in order to display the image of the legend. Here is the final method:
trigger:function() {
        var panelNode = this.createPanel(this._("widget.exampleLegend.popup.title"));

        var linkNode = Y.Node.create(this.getImageHtml());
        panelNode.appendChild(linkNode);

        this.showPanel();
},
The _(key), createPanel(name) and showPanel() methods belong to the basic API of a widget. Each widget has a window (a pane) that is linked with a unique identifier. It is possible to create other windows, but they must be defined directly from the widget. The localisation key must be added to the properties file of the jar.
The HTML part of the interior of the window is defined by the getImageHtml() method. A node is then created and then added to the window:
getImageHtml:function() {
        var imageUrl = "/" + this.getContextUrl() + "/combo?resources/images/sample_legende.png";
        var html = "<img src='" + imageUrl + "' class='imageLegend'>";
        return html;
}
In this method, the HTML tag is created. The getContextUrl() method belongs to the basic widget API. The image is stored under the widget resources. A Class is associated in order to define the position of the image in the window.
The full description of this widget is currently as follows:
YUI.add("geoconcept-widget-example-legend", function(Y) {

        /* ExampleLegend class constructor */
        function ExampleLegend(config) {
                ExampleLegend.superclass.constructor.apply(this, arguments);
        }

        /*
         * Required NAME static field, to identify the Widget class and
         * used as an event prefix, to generate class names etc. (set to the
         * class name in camel case).
         */
        ExampleLegend.NAME = "exampleLegend";

        Y.extend(ExampleLegend, Y.GCUI.WidgetButton,  {
                initializer: function(config) {
                        ExampleLegend.superclass.initializer.apply(this);
                },

                destructor: function() {
                        ExampleLegend.superclass.destructor.apply(this);
                },

                configureAction: function() {
                        ExampleLegend.superclass.configureAction.apply(this);
                },

                /*
                 * Action after click on button
                 */
                trigger:function() {
                        var panelNode = this.createPanel(this._("widget.exampleLegend.popup.title"));

                        var linkNode = Y.Node.create(this.getImageHtml());
                        panelNode.appendChild(linkNode);

                        this.showPanel();
                },

                /*
                 * Get HTML description for image legend
                 * return string html
                 */
                getImageHtml:function() {
                        var imageUrl = "/" + this.getContextUrl() + "/combo?resources/images/sample_legende.png";
                        var html = "<img src='" + imageUrl + "' class='imageLegend'>";
                        return html;
                }
        });
        Y.namespace("GCUI");
        Y.GCUI.ExampleLegend = ExampleLegend;

}, "1.0.0", {requires: ["project-widgetbutton"] });
In this example, a class has been added to define the margins around the legend to improve its positioning in the window.
.imageLegend {
        margin: 5px;
}
Here are the images needed for the creation of this widget.
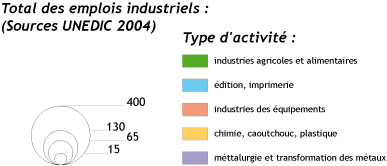

Place these images in the src/scripts/resources/images directory.
By default, a button possesses 2 localisation keys, label and description. label is used in the designer accordion, and description is displayed when the mouse cursor glides over the button.
Take care to see that the keys ALWAYS start by widget.(id for the widget).(end of the key). For this widget, the key for the label will be widget.exampleLegend.label
Here are the base keys to put in the properties file:
widget.exampleLegend.label=Exemple de l\u00E9gende
widget.exampleLegend.description=Afficher la l\u00E9gende principale
Here is the key to display a title in the window:
widget.exampleLegend.popup.title=L\u00E9gende
This widget allows you to draw a point on the map. It is a push button type widget, by clicking on it, the user can activates the feature. A property in the Composer will determine the image stored in the database to be displayed after a click on the map.
The widget is named ExampleDrawPOI.
Create the 3 files of the widget in the annotation directory:
- ExampleDrawPOI.xml
- ExampleDrawPOI.js
- ExampleDrawPOI.css
This example allows the user to add a widget property. Here is the configuration of the description file:
<widget id="exampleDrawPOI"
                category="standard"
                position="13"
                icon="resources/images/exampleDrawPOI.png"
                js="annotation/ExampleDrawPOI.js"
                module="geoconcept-widget-example-draw-poi"
                display="true"
                lang="resources/exampleLang">
        <properties>
                <property id="defaultImage" type="combobox">
                        <params value="poi_blue_small"/>
                </property>
        </properties>
</widget>
-
properties: serves to add the widget properties. -
property: detail of a property composed of a unique identifier and a Class. -
params: default parameter for the corresponding parameter. This tag is not mandatory in the case where there is no default value.
For further information, see the description of XML files in the chapter on widgets.
The widget created is a TOOL type button, and when the user clicks on the button, it remains activated. A single TOOL type button can be activated at any one time, and all the other buttons of this type are then disabled. The two methods used are activate() and de-activate. On activation, the widget calls a function to enable the listener via a click on the map. When it comes to disabling the same, the listener will be deleted. Here are 2 basic methods for the widget:
activate:function() {
        ExampleDrawPOI.superclass.activate.apply(this);
        this.createPoiListener();
},

deactivate:function() {
        ExampleDrawPOI.superclass.deactivate.apply(this);
        this.removeCreatePoiListener();
},
The creation of a listener following a mouse-click on the map is based on the address: API Javascript
createPoiListener:function() {
        var wExampleDrawPOI = this;

        function clickListener(dynMap){}

        clickListener.prototype.onSelect = function(x,y,xpx,ypx){
                wExampleDrawPOI.createObject(x,y);
        };

        var listener = new clickListener();
        DynMapAddMouseSelectionEventListener(this.getMap(), "clickOnMap", listener)
},
The method draws on the DynMapAddMouseSelectionEventListener function, to which it is possible to pass a listener (listener) as parameter. A mouse-click activates the createObject (x,y) function. The x and y coordinates will enable the user to position the object on the map.
The addition of the point is made in the API Javascript object layer. The image displayed to reperesent the point is defined from a url.
var imageUrl = this.getHost() + this.getContextUrl() + "/Image/showImage.do?name=" +
                                                        this.getPropertyValue(ExampleDrawPOI.IMAGE_PROPERTY_NAME);
The getHost(), getContextUrl() and getPropertyValue(name) methods belong to the basic widget API. ExampleDrawPOI.IMAGE_PROPERTY_NAME is a constant defined in the module in the following way:
ExampleDrawPOI.IMAGE_PROPERTY_NAME = "defaultImage";
getPropertyValue(name) is the method allowing you to search for the value of a property. Each widget can benefit from properties
that you need to define in its description file. All widgets possess, by default, a property relating to the choice of groups
having access to this widget in the case of a private portal. Widgets of the button type possess, in addition, a property
defining whether the widget is active by default. The other properties are created automatically as a function of the description
file but if the type of property does not exist, you can then proceed to use the addProperties(groups) method.
To retrieve the images from the database, you need to call the getImages method of the REST API. The result is returned in the onSuccess() or onError() method, in the case of success or failure of a search action.
this.getEGWApi().getImages({
        onSuccess:function(response) {
        },
        onError:function(response) {
        }
});
Following retrieval of images, you need to associate the result to the drop-down list for the property using the setComboboxOptions(propertyId, data) method.
this.setComboboxOptions(ExampleDrawPOI.IMAGE_PROPERTY_NAME, images);
The full description of this widget is currently as follows:
YUI.add("geoconcept-widget-example-draw-poi", function(Y) {

        /* ExampleDrawPOI class constructor */
        function ExampleDrawPOI(config) {
                ExampleDrawPOI.superclass.constructor.apply(this, arguments);
        }

        /*
         * Required NAME static field, to identify the Widget class and
         * used as an event prefix, to generate class names etc. (set to the
         * class name in camel case).
         */
        ExampleDrawPOI.NAME = "exampleDrawPOI";
        ExampleDrawPOI.IMAGE_PROPERTY_NAME = "defaultImage";

        Y.extend(ExampleDrawPOI, Y.GCUI.WidgetButton,  {
                initializer: function(config) {
                        ExampleDrawPOI.superclass.initializer.apply(this);
                        this.setType(Y.GCUI.WidgetButton.TYPE_TOOL);
                        this.getImages();
                },

                destructor: function() {
                        ExampleDrawPOI.superclass.destructor.apply(this);
                },

                configureAction: function() {
                        ExampleDrawPOI.superclass.configureAction.apply(this);
                },

                activate:function() {
                        ExampleDrawPOI.superclass.activate.apply(this);
                        this.createPoiListener();
            },

            deactivate:function() {
                ExampleDrawPOI.superclass.deactivate.apply(this);
                this.removeCreatePoiListener();
            },

            createPoiListener:function() {
                        var wExampleDrawPOI = this;

                        function clickListener(dynMap){}

                        clickListener.prototype.onSelect = function(x,y,xpx,ypx){
                                wExampleDrawPOI.createObject(x,y);
                        };

                        var listener = new clickListener();
                        DynMapAddMouseSelectionEventListener(this.getMap(), "clickOnMap", listener)
                },

                // Remove create poi listener
                removeCreatePoiListener:function() {
                        DynMapRemoveListener(this.getMap(),"click","clickOnMap");
                },

            // add points from list of citysite
                createObject:function(x,y) {
                        var map = this.getMap();
                        var imageUrl = this.getHost() + this.getContextUrl() + "/Image/showImage.do?name=" +
                                                        this.getPropertyValue(ExampleDrawPOI.IMAGE_PROPERTY_NAME);
                        var poi = {
                        mapx : x,
                        mapy : y,
                        imgsrc : imageUrl
                    };
                    map.objectLayer.addObject(poi);
                        map.objectLayer.refresh();
                },

                /**
                 * Method: Get images on geoweb server. Call egw api rest method
                 */
                getImages : function() {
                        var wExampleDrawPOI = this;

                        this.getEGWApi().getImages({
                                onSuccess : function(response) {
                                        // For images properties, we add the images of geoweb
                                        // database
                                        var result = response.result;
                                        var images = [""];

                                        for (i = 0; i < result.length; i++) {
                                                var image = result[i];
                                                images.push(image.name);
                                        }

                                        wExampleDrawPOI.setComboboxOptions(ExampleDrawPOI.IMAGE_PROPERTY_NAME, images);
                                },
                                onError : function(response) {
                                        alert("Poi getImages error " + response.status + ", "
                                                        + response.message);
                                }
                        });
                }
        });
        Y.namespace("GCUI");
        Y.GCUI.ExampleDrawPOI = ExampleDrawPOI;

}, "1.0.0", {requires: ["project-widgetbutton"] });
Here is the image needed for the creation of this widget.

Here are the base keys to put in the properties file:
widget.exampleDrawPOI.label=Exemple de points
widget.exampleDrawPOI.description=Cr\u00E9er un point sur la carte
To the title name of the property of the choice of image, it will be necessary to add the following key:
widget.exampleDrawPOI.defaultImage=Images :
For more information about resources, refer to the widget called ExampleLegend.
This widget allows display of X and Y coordinates following a click on the map.
The widget is called ExampleXY.
Create the 3 widget files in the navigation directory:
- ExampleXY.xml
- ExampleXY.js
- ExampleXY.css
Here is the configuration of the description file:
<widget id="exampleXY"
        category="standard"
        position="14"
        icon="resources/images/exampleXY.png"
        js="navigation/ExampleXY.js"
        module="geoconcept-widget-example-xy"
        display="true"
        lang="resources/exampleLang">
</widget>
For further information, see the description of XML files in the chapter on widgets.
The widget created is of the basic type. It has no structure, and it is up to the developer to create its interface. The man-machine-interface for the widget has to be defined in the getWidget() method. For the display in the design tool, the widget must be de-activated. To do this, 2 methods are available in the basic widget API: isPortal() and getWrapper(). The first of these defines whether the application is displayed in the portal or the design tool. The second enables retrieval of the template that can be superposed over it to disable the widget.
getWidget: function() {
        var htmlContent = "<div class='xyBG'><div class='xyField'><label>"+this._("widget.exampleXY.x") +
        "</label></br><input type='text' id='x' size='15' disabled='disabled'/></div>" +
    "<div class='xyField'><label>" + this._("widget.exampleXY.y") +
    "</label></br><input type='text' id='y' size='15' disabled='disabled'/></div>" +
    "<div class='xyButton egw-btn'><button id='searchXY'>" + this._("widget.exampleXY.button") + "</button></div>";

        if (!this.isPortal()) {
                htmlContent = htmlContent + this.getWrapper();
        }
        htmlContent += "</div>";
        return ("<div id='"+this.getId()+"'>"+htmlContent+"</div>");
},
As for the example, this widget deploys a listener on the mouse-click event. The activation will then occur on a mouse-click on the searchXY button. The event positioned in the _configureAction (1) function will activate the listener. The _configureAction() function is called following construction of the widget in the man-machine-interface.
configureAction: function() {
        ExampleXY.superclass.configureAction.apply(this);
        if (this.isPortal()) {
                Y.one("#searchXY").on("click", this.clickOnMapListener, this);
        }
},
To disable the listener, the overloaded function is reinitView(). This function can be called by the Y.fire("reinitView") event (used notably by the Erase widget supplied by default).
reinitView: function() {
        this.removeClickOnMapListener();
},
Following the activation of this widget, each click on the map will allow the display of x and y coordinates of the mouse.
setXY: function(x,y) {
        var map = this.getMap();
        Y.one("#x").set("value", x*map.precision);
        Y.one("#y").set("value", y*map.precision);
}
The full description of this widget is currently as follows:
YUI.add("geoconcept-widget-example-xy", function(Y) {

        /* ExampleXY class constructor */
        function ExampleXY(config) {
                ExampleXY.superclass.constructor.apply(this, arguments);
        }

        /*
         * Required NAME static field, to identify the Widget class and
         * used as an event prefix, to generate class names etc. (set to the
         * class name in camel case).
         */
        ExampleXY.NAME = "exampleXY";

        Y.extend(ExampleXY, Y.GCUI.WidgetBase,  {
                initializer: function(config) {
                        ExampleXY.superclass.initializer.apply(this);
                },

                destructor: function() {
                        ExampleXY.superclass.destructor.apply(this);
                },

                configureAction: function() {
                        ExampleXY.superclass.configureAction.apply(this);
                        if (this.isPortal()) {
                                Y.one("#searchXY").on("click", this.clickOnMapListener, this);
                        }
                },

                reinitView: function() {
                        this.removeClickOnMapListener();
                },

                getWidget: function() {
                        var htmlContent = "<div class='xyBG'><div class='xyField'><label>"+this._("widget.exampleXY.x") +
                        "</label></br><input type='text' id='x' size='15' disabled='disabled'/></div>" +
                    "<div class='xyField'><label>" + this._("widget.exampleXY.y") +
                    "</label></br><input type='text' id='y' size='15' disabled='disabled'/></div>" +
                    "<div class='xyButton egw-btn'><button id='searchXY'>" + this._("widget.exampleXY.button") + "</button></div>";

                        if (!this.isPortal()) {
                                htmlContent = htmlContent + this.getWrapper();
                        }
                        htmlContent += "</div>";
                        return ("<div id='"+this.getId()+"'>"+htmlContent+"</div>");
                },

                clickOnMapListener: function() {
                        var wExampleXY = this;

                        function clickListener(){}

                        clickListener.prototype.onSelect = function(x,y,xpx,ypx){
                                wExampleXY.setXY(x,y);
                        };

                        var listener = new clickListener();
                        DynMapAddMouseSelectionEventListener(this.getMap(), "getXY", listener)
                },

                // Remove create poi listener
                removeClickOnMapListener: function() {
                        DynMapRemoveListener(this.getMap(),"click","getXY");
                },

                setXY: function(x,y) {
                        var map = this.getMap();
                        Y.one("#x").set("value", x*map.precision);
                        Y.one("#y").set("value", y*map.precision);
                }
        });
        Y.namespace("GCUI");
        Y.GCUI.ExampleXY = ExampleXY;

}, "1.0.0", {requires: ["project-widgetbase"] });
In this example, as the widget is not a button, the css file must be enriched to personalise the tool. Below is one of the possible displays for this widget.
.xyField {
        padding: 0 10px;
        float: left;
}

.xyButton {
        float: left;
        padding: 13px 0px 0px;
}

.xyBG {
        width: 100%;
        height: 40px;
}

.xyField label{
        font-weight: bold;
}
Here is the image needed for the creation of this widget.

Here are the base keys to put in the properties file:
widget.exampleXY.label=Exemple de coordonn\u00E9es
widget.exampleXY.description=R\u00E9cup\u00E9rer les coordonn\u00E9es \u00E0 partir d\'un clic
For the other widget texts, it will be necessary to add the following keys:
widget.exampleXY.button=Activer
widget.exampleXY.x=X
widget.exampleXY.y=Y
For more information about resources, refer to the widget called ExampleLegend.
