This document describes the installation procedure for the Universal Geocoder Server application. Selecting which components to install is a vital stage in the installation process:
- UGC JEE,
- UGC Command Line,
- UGC .NET. (not available with Geoconcept Web)
These components are quite independent of one another, and fulfil different purposes. For example, the JEE UGC component is needed by the “Geocoder” widget.
This document also describes how to set up the UGC resource adaptor as a function of the target application server.
Finally, the installation of the files needed for the autocomplete functionality is described in this document. For further information about using the autocomplete web service, please refer to the section API and Web Services section of Geoconcept Web.
The following procedure does not concern Geoconcept Web since its installer takes charge of installing and configuring the JEE UC component.
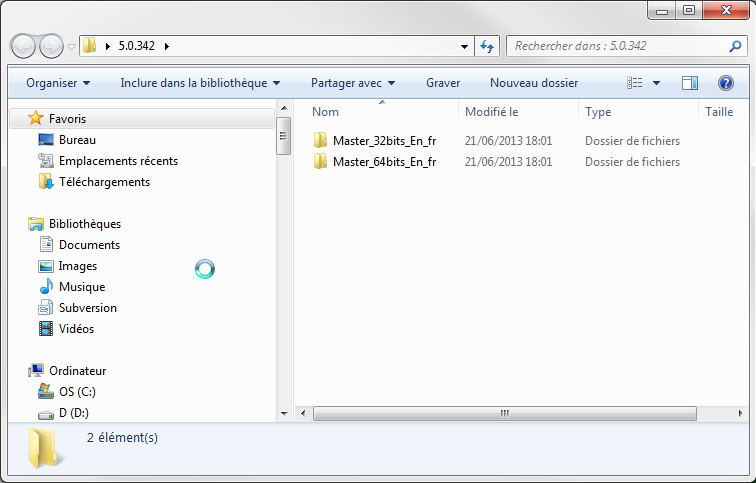
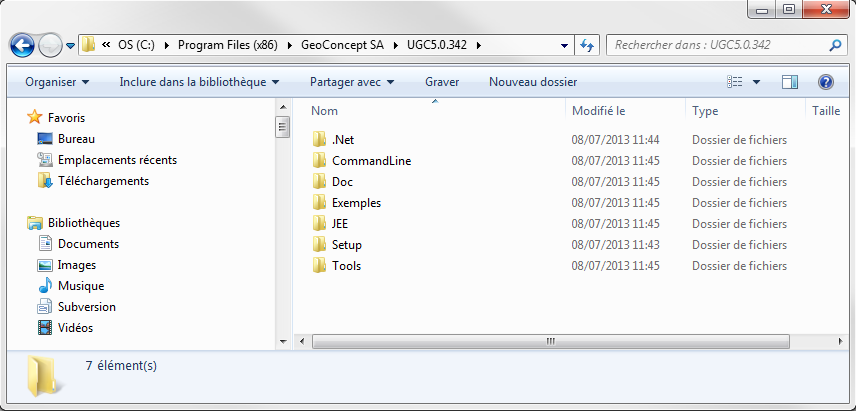
Having unzipped the downloaded folder, you will find two directories: one for the 32-bit installer and one for the 64-bit installer. Choose the one that is best for your particular architecture.
![[Tip]](images/community/docbook/tip.png) |
Tip |
|---|---|
|
When using UGC JEE, the 32-bit or 64-bit version should be selected to suit your Java and Apache Tomcat architecture :
The importance of this choice is crucial with regard to the DLL utilised to make the UGC Server function. A 32-bit JEE UGC deployed in a 64-bit environment will not function, and vice versa. We recommend installing the 64-bit version. |
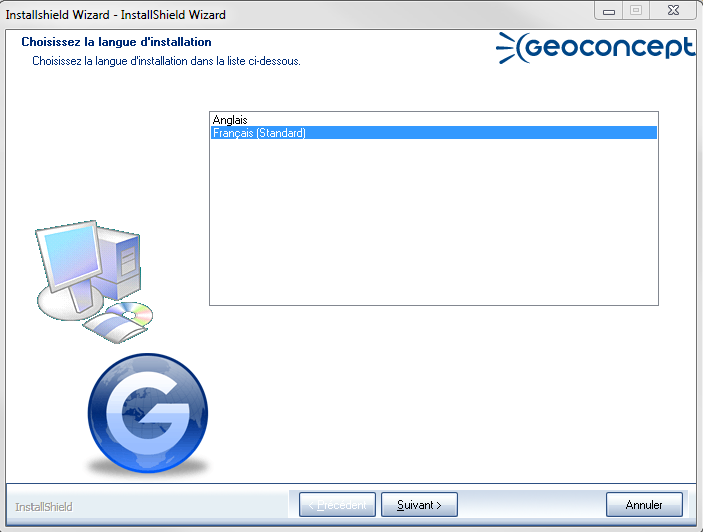
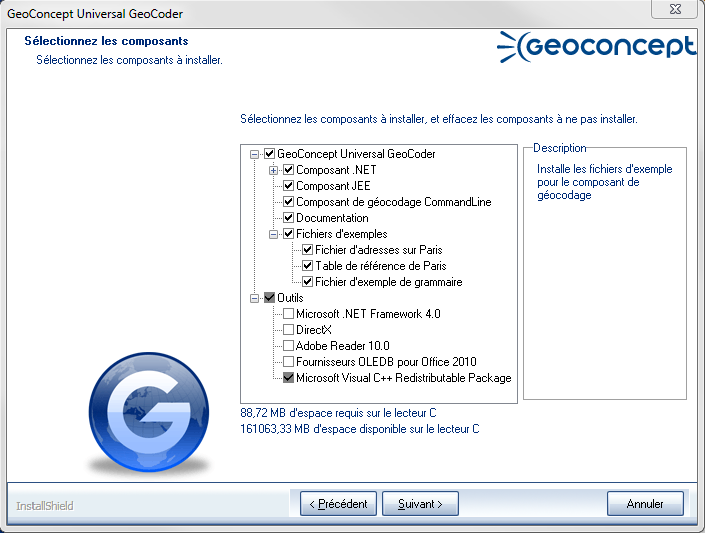
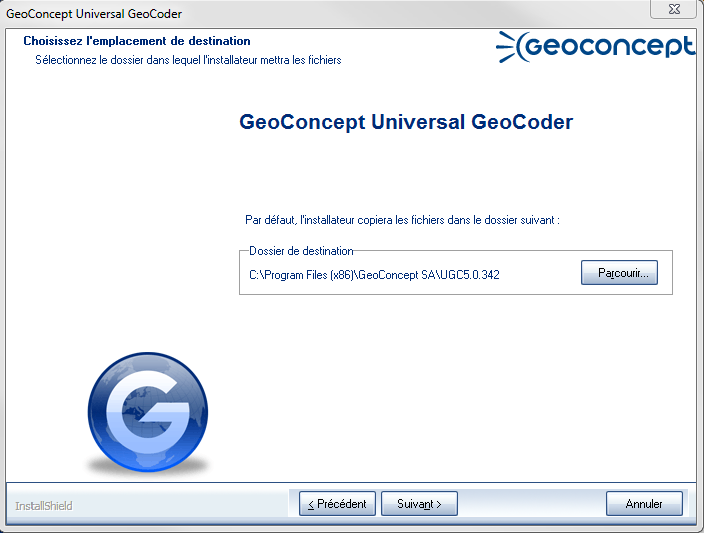
Run the setup.exe installer and then follow the different steps as guided by the installation assistant.
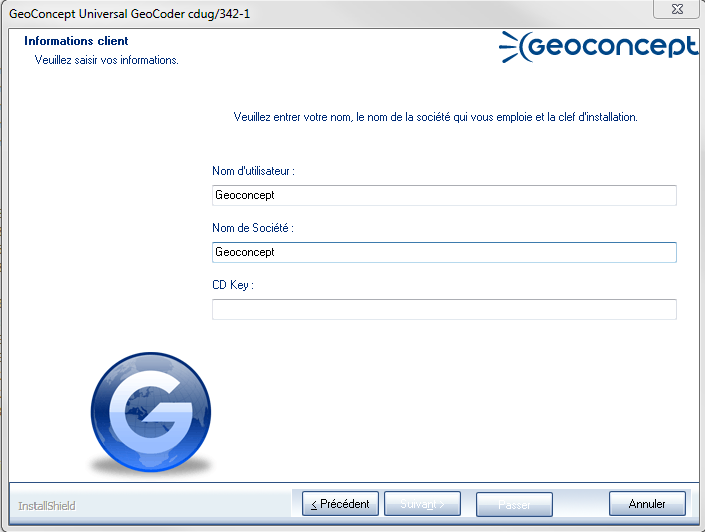
You must choose the components needed for your installation depending on how you intend to use the configuration:
- .NET component,
- JEE Component,
- CommandLine component,
|
Tip |
|---|---|
|
The .ugc.xxi referencial geocoding should be stored in the “<UGC_HOME>”\JEE\ugc\reftables directory (this is the default directory) or
in a dedicated directory of the D:\TableRef type. This dedicated directory must be configured in the |
This chapter describes the setting up of the UGC resource adaptor. The deployment mode depends on the target application Server.
|
Tip |
|---|---|
|
Using the Apache Tomcat server in the framework of an installation of Geoconcept Web is described in the Geoconcept Web manual. |
The remainder of this section describes the configuration in a framework other than that of Geoconcept Web. Certain elements may be similar to a utilisation in the framework of Geoconcept Web.
The directory in which Tomcat is installed is referred to as %tomcat%.
Common Lib
In %tomcat%/common/lib, copy the files stored into %liverable%/tomcat/lib:
- ugc.jar: main library for the ugc-jee resource adaptor,
- jdom.jar: manipulation of XML documents,
- activation.jar: as this is a necessary item, it should be copied if not present,
- javax-resource.jar: required by the resource adaptor.
Configuration of server.xml
At the level of the main Tomcat configuration file, you need to declare the primary service provider by associating it with a logical name (JNDI): in tomcat%/conf/server.xml, edit the tag GlobalNamingResources and add:
- for Tomcat 7 and 8:
<Resource
        name="geoconcept/ugc/default"
        type="com.geoconcept.ugc.connect.tomcat.ConnectionFactory"
        scope="Shareable"
        description="UGC connection factory - local dll"
        auth="Container"
        RootDirectory="%geoconcept%\ugc\"
        factory="com.geoconcept.ugc.connect.tomcat.ConnectionFactory"
        ConnectionMode="LocalDll"
/>
|
Tip |
|---|---|
|
For all versions of Tomcat, the RootDirectory parameter must correspond to the root of the ugc hierarchical tree external to the application server (containing the conf, native and reftables directories). |
|
Tip |
|---|---|
|
You can add the parameter |
In the Server section, you must add:
<Listener className="com.geoconcept.ugc.connect.tomcat.LifeCycleListener" resource="geoconcept/ugc/default" />
|
Tip |
|---|---|
|
Addition of the In the scenario where the logical name used is not that used by default (geoconcept/ugc/defaut) adapt the configuration. |
Creating resource / webapps links in Tomcat
For Tomcat, for webapps that are using a resource, it will be necessary to declare this at the level of the webapp context descriptor. For Tomcat 7 and 8, the webapp configuration files can be externalised from conf/server.xml and be placed under conf/catalina/localhost (by default).
So, for each webapp using the primary provider (referenced via JNDI), such as ugc-admin or ugc-samples, a series of context files are provided (for Tomcat 7 and 8), and for this reason, for each webapp that must be deployed, it will be necessary to:
- copy the .war into /webapps
- copy the context description .xml file into /conf/catalina/localhost
In the same way, if you create your own webapp that uses the primary provider, you must declare this link:
- by a separate file for Tomcat 7 and 87
for Tomcat 7 and 8:
- Copy the ugc-admin.xml file that is under %deliverable%\tomcat\conf into the %tomcat%/conf/catalina/localhost directory;
- Copy the axis.xml file that is in%liverable%\tomcat\webapps into the %tomcat%/conf/catalina/localhost directory (this is useful exclusively for using JEE Universal Geocoder in remote access mode).
|
Tip |
|---|---|
|
To define other context files (file.xml) for other web applications, it will be necessary to add the following lines: |
<ResourceLink
        global="geoconcept/ugc/default"
        name="geoconcept/ugc/default"
        type="com.geoconcept.ugc.connect.tomcat.ConnectionFactory"
/>
Axis
This part of the installation is only useful when using Universal geocoder JEE in remote access mode.
Copy the axis directory that is stored under install\tomcat\webapps into the %tomcat%\webapps directory.
|
Tip |
|---|---|
|
The documentation for installing axis is accessible at : http://ws.apache.org/axis/java/install.html#webapp. To test axis, call http://localhost:8080/axis and then validate. HappyAxis is an auto-test. Verify that it is not flagging up any problem with the libraries. |
Any missing optional libraries will not be a problem (mail, attachments, xml security, etc).
AddressFinderService Installation
In %tomcat%/webapps/axis/WEB-INF/lib, copy the file called ugc-axis.jar that is in install\tomcat\axis-std.
Deployment of the AddressFinder service:
- Run Tomcat,
- Open a command line window in the \install\tomcat\axis-std directory and then execute deploy. (If the server port is not 8080, modify the file called deploy.bat. Do the same thing for the host if this is not localhost).
|
Tip |
|---|---|
|
The Axis libraries must be in the CLASSPATH. |
If the service is correctly deployed, the server responds:
...
Processing file AddressFinderServiceAxis.wsdd
<Admin>Done processing</Admin>
If the service is not correctly deployed, an error message displays.
There are two deployment modes:
- EITHER the resource adaptor is deployed in standalone mode (on its own) and in this case, the service is accessible to any other module deployed on the same Jboss instance,
- OR the resource adaptor is deployed in an enterprise application that contains the publishing modules and in this case the service is not accessible to any other module deployed on the same Jboss instance (this is equivalent to a full pre-deployment).
Standalone adaptor
- Copy the ugc.rar file that is in%livrable%\jboss\standalone\ra\deploy into the %jboss%/deploy directory,
- Copy the ugc-ds.xml file that is in %deliverable%\jboss\standalone\ra\deploy into the %jboss%/deploy directory; then edit it in order to modify the RootDirectory value,
- Copy the ugc-common.jar file that is in %deliverable%\jboss\standalone\ra\lib into the %jboss%/lib directory.
In the form of the enterprise application archive (EAR)
- Copy the ugc-all.ear file that is in %livrable%\jboss\standalone\ra\deploy into the %jboss%/deploy directory,
- Copy the file called ugc-ds.xml stored in %livrable%\jboss\standalone\ra\deploy into the %jboss%/deploy directory; then edit it in order to modify the RootDirectory value.
The resource adaptor (ugc.rar) is deployed in standalone mode (on its own), the service is accessible to any other module deployed on the same Jboss instance whether it is a module supplied as ugc-admin or ugc-ws or a specific module written by the user).
The deployment and configuration procedure follows Jonas recommendations: the module configuration has to be modified and then deployed via one of the methods proposed by Jonas.
Deliverable
If the deliverable is in the form of an archive (a .zip file or .tar.gz) it needs to be extracted into a work directory (for example, via the “tar xvfz ugc-jee-5.0.112.tar.gz” under linux), if in expanded form, recopy it into a work directory.
Modify the ugc.rar configuration to adapt it to the local installation
The UGC resource adaptor configuration must be modified (ugc.rar located in jonas/standalone/ra/deploy) in order to indicate the local installation filepath.
To do this, the Jonas procedure is as follows: the jonas-ra.xml file must be extracted from the archive (.rar) and then modified, and then the archive updated with the modified file. The Jonas RAConfig tool serves to generate the jonas-ra.xml from the standard ra.xml file, but here this is of no interest since the jonas-ra.xml file is supplied. So the jar tool from java jdk will suffice to extract and update the archive. If JAVA_HOME/bin is not in the PATH, it should be added temporarily (or, alternatively, invoke the jar tool by including this directory, e.g. /etc/java/jdk1.5.0_22/bin/jar)
- Extraction of the jonas-ra.xml file: jar xvf ugc.rar META-INF/jonas-ra.xml. This will allow creation of a META-INF sub-directory and the jonas-ra.xml file inside,
- Editing the jonas-ra.xml file: modify the extracted jonas-ra.xml file in order to indicate in the RootDirectory property value the directory in which UGC has been installed. If you wish to use a reference tables directory that is different to the default directory (%ugc%/reftables) indicate this in the RefTablesDirectory optional property. Otherwise, leave the option property as it is.
- Update the archive (.rar): jar uvf ugc.rar META-INF/jonas-ra.xml
The updated archive is ready to be deployed on a Jonas instance.
Deployment on Jonas 4.x
The Jonas resource service must be configured and run at start-up (which is the case in the default configuration). That is to say that in the jonas.properties file, the resource value must be present in the list of values for the jonas.services property.
There are several ways of deploying a RAR file on a Jonas instance:
- modify the values of jonas.service.resource.resources property in the jonas.properties file: to add to it ugc (the suffix .rar is not mandatory). Example: jonas.service.resource.resources ugc,
- place the file in the autoload directory of connectors, by default this being $JONAS_BASE/rars/autoload,
- on the command line via the jonas admin -a ugc.rar command,
- using the web administration console (jonasAdmin) accessible by default via http://localhost:9000/jonasAdmin,
![[Warning]](images/community/docbook/warning.png) |
Warning |
|---|---|
|
For further details, consult http://jonas.ow2.org/JOnAS_4_7/doc/PG_Connector.html#PG_Connector-Use |
Deployment via the rars/autoload directory and deployment via jonasAdmin are described below.
- Deployment via the rars/autoload directory: copy the ugc.rar file prepared in $JONAS_BASE/rars/autoload and restart Jonas.
-
Deployment via jonasAdmin
- Select Deployment Deployment > Resource Adaptor Modules (RAR) in the hierarchical tree,
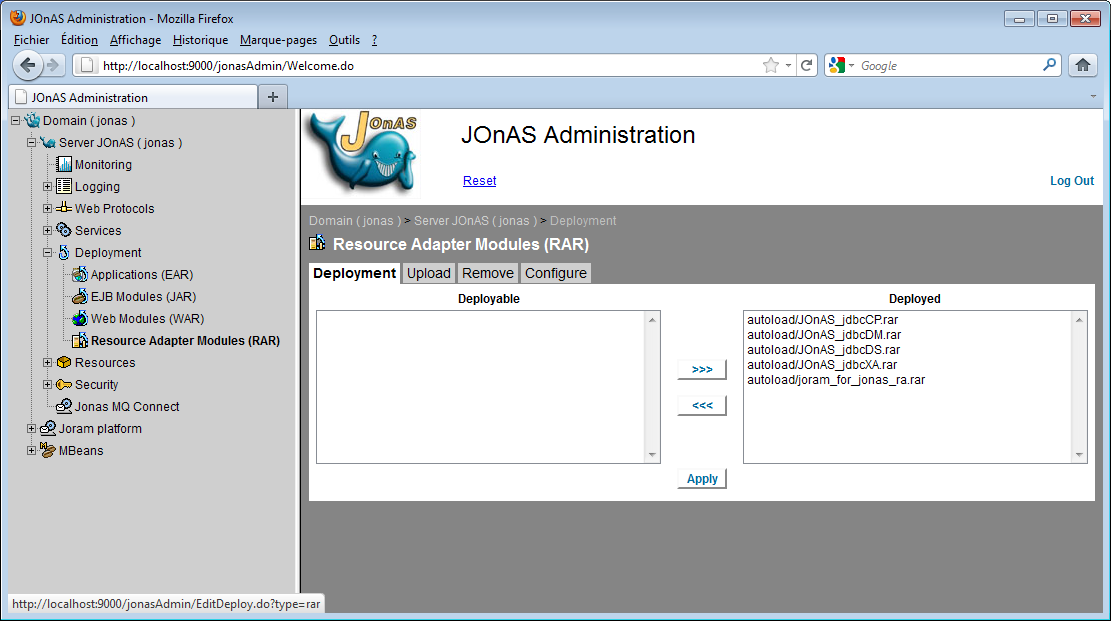
- Select the Upload tab,

- Upload the file from the location where it has been prepared on the disk. Check upload into the autoload directory, if not, the deployment will only take place for the current session of the Jonas instance. Then validate via the Upload button.
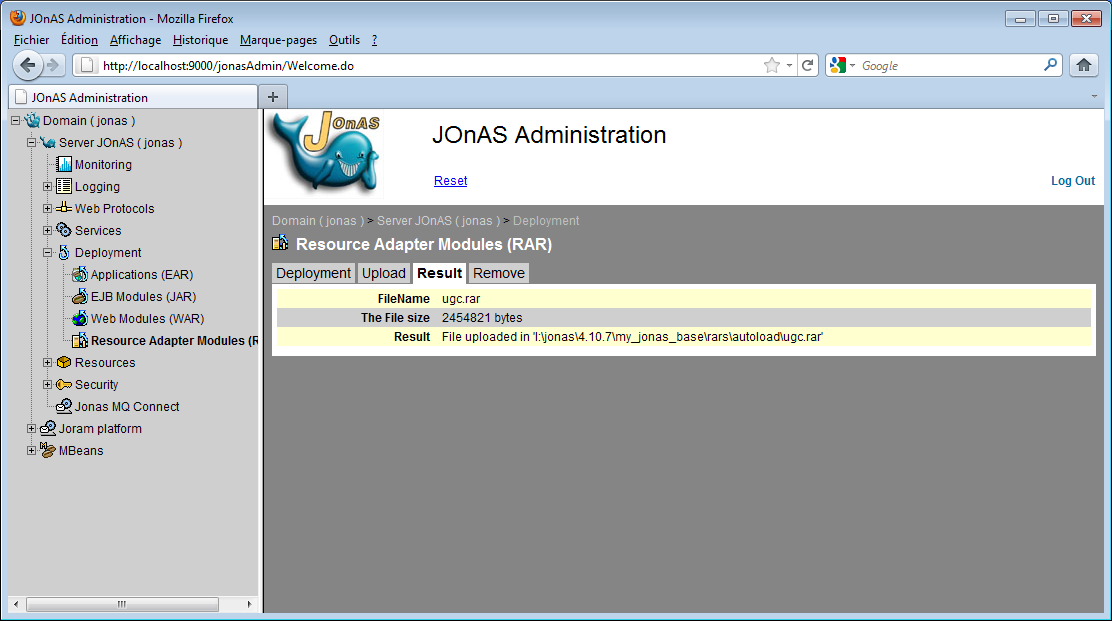
This will have the effect of copying ugc.rar into the JONAS_BASE/rars/autoload directory.
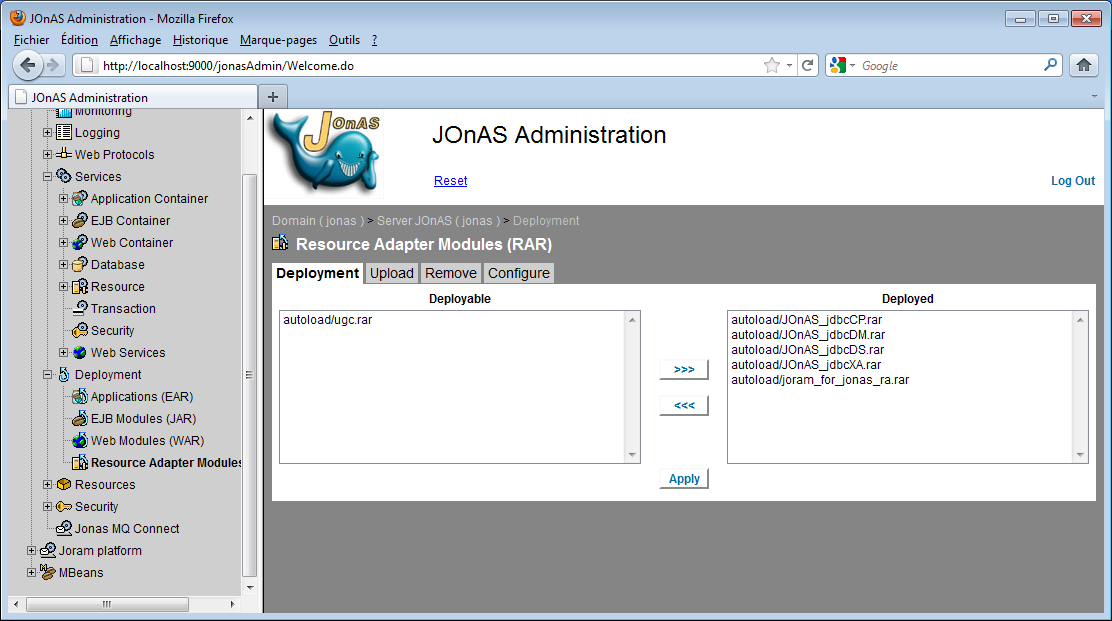
The module is now “deployable”.
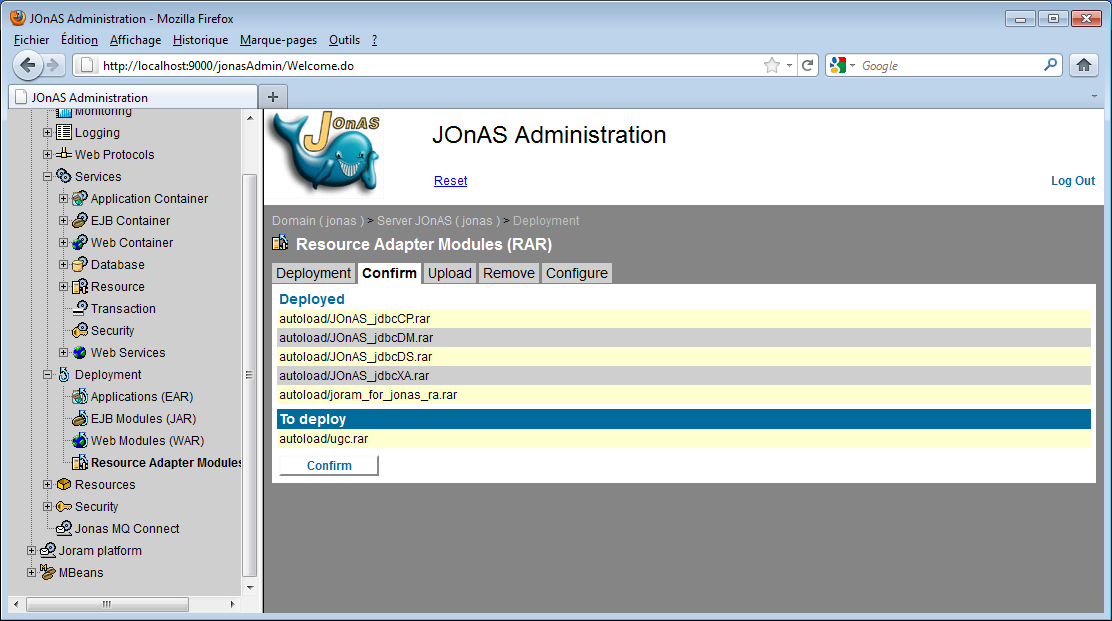
- D) Add ugc.rar to the modules already deployed and confirm.
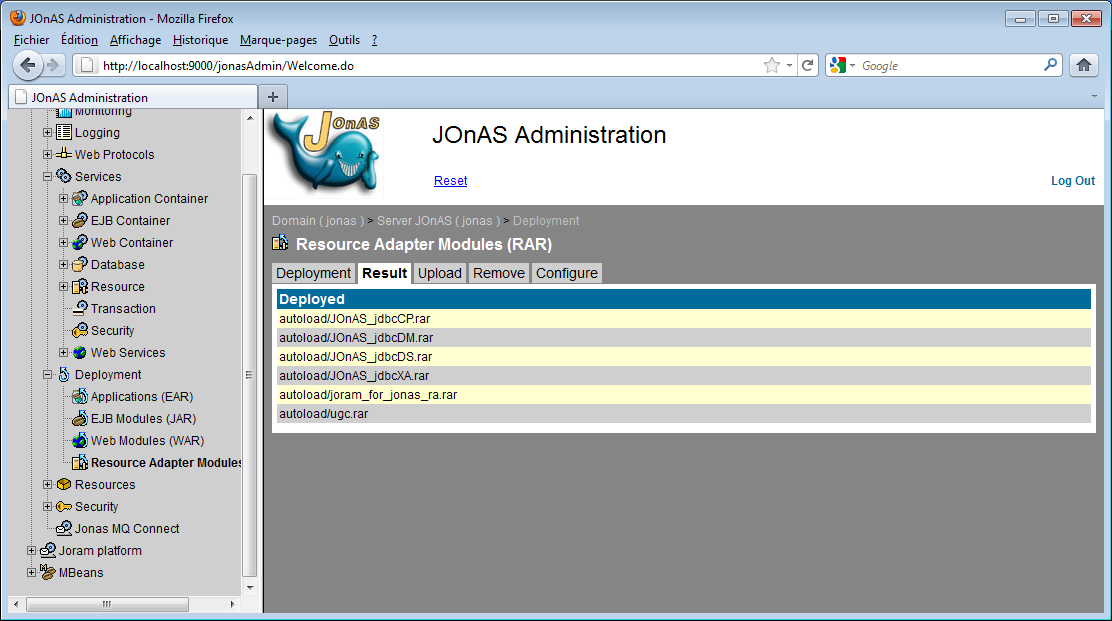
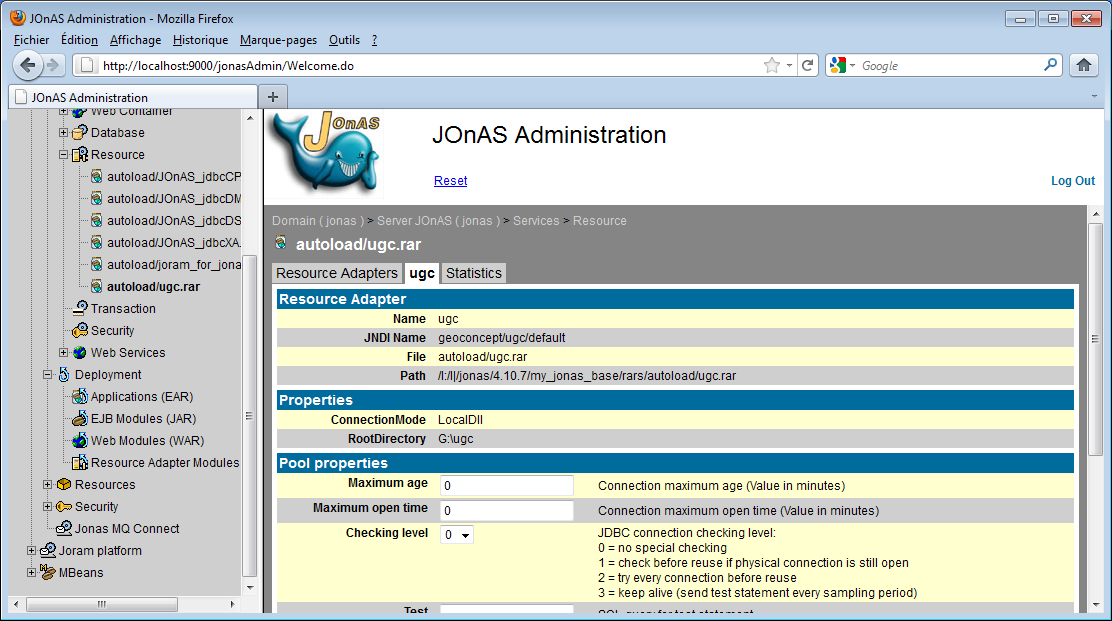
The module is now deployed. At the level of the hierarchical tree on the server (on the right) it appears in Services/Resource:
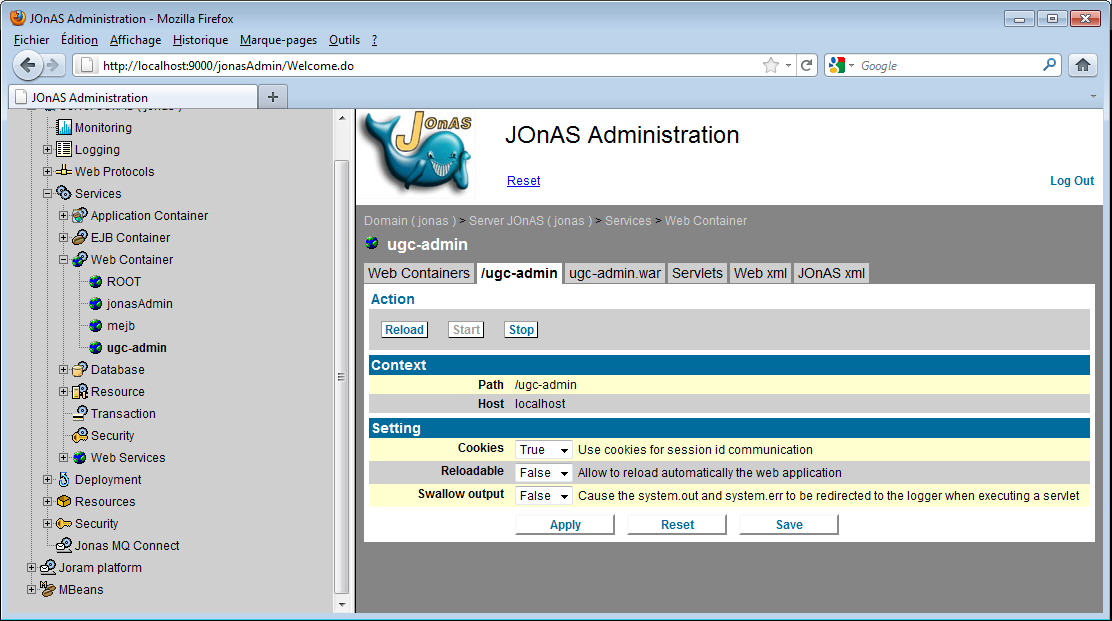
Deployment of ugc-admin (optional):
ugc-admin is an administration webapp that tests (among other things) for the correct functioning of ugc-jee. Its deployment is optional. The principle for deployment is the same as for the (ugc.rar) resource adaptor, even though in this instance it concerns just the Web Modules (WAR) section, and this module does not require configuration.

Then deployment:
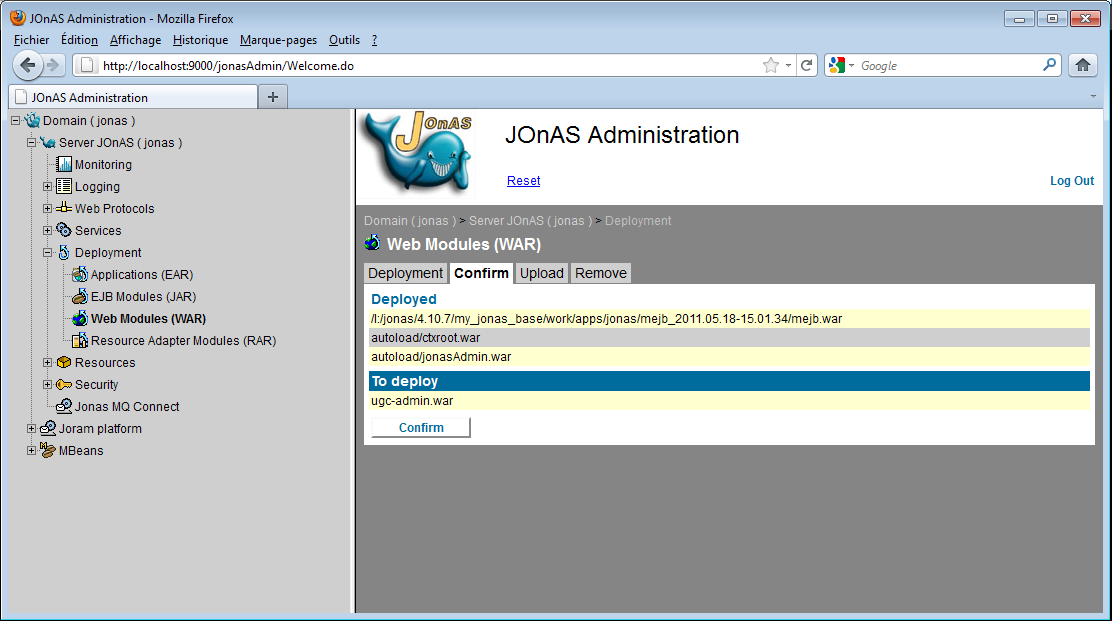
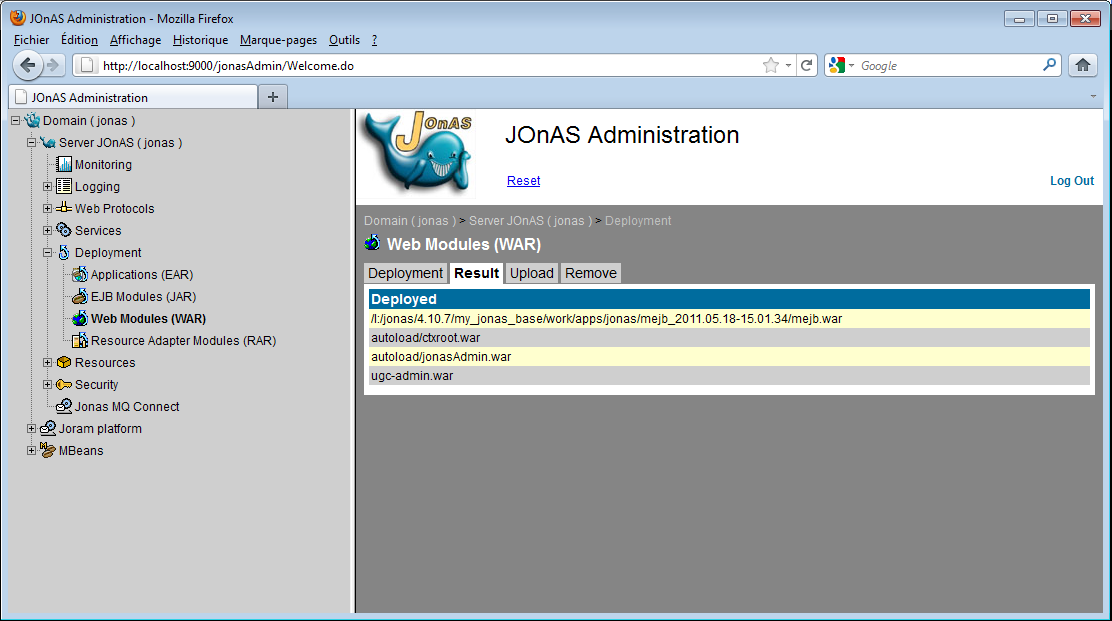
The webapp is deployed.
Setting up a web service client provider on jonas 4.x
Jonas 4.x not delivering any saaj 1.3 implementation, it is necessary to place the saaj-impl-1.3.2.jar library (that can be taken in redist/providers-libs/ws-saas-client-saaj13/libs) or a more recent version in JONAS_BASE/libs/apps.
Example of configuring a web service client provider of the saas type based on saaj (extracted from a jonas-ra.xml file):
<jonas-config-property>
        <jonas-config-property-name>ConnectionMode</jonas-config-property-name>
        <jonas-config-property-value>WssClient</jonas-config-property-value>
</jonas-config-property>
<jonas-config-property>
        <jonas-config-property-name>ServerUri</jonas-config-property-name>
        <jonas-config-property-value>http://owss.geoconcept.com:2010/service/soap11</jonas-config-property-value>
</jonas-config-property>
<jonas-config-property>
        <jonas-config-property-name>Key</jonas-config-property-name>
        <jonas-config-property-value>123456</jonas-config-property-value>
</jonas-config-property>
Deployment on Jonas 5.x
The deployment is identical to Jonas 4.x, except for the fact that the $JONAS_BASE/deploy directory replaces the directories that are differentiated $JONAS_BASE/rars/autoload, $JONAS_BASE/webapps/autoload) for the deployment.
The deployment environment described is Borland Enterprise server, AppServer Edition version 5.2.1.
The resource adaptor (ugc.rar) and a series of publishing modules (ugc-admin.rar) are deployed in the form of an enterprise application (.ear archive): ugc-all.ear.
Configuring ugc-all.ear: before deploying ugc-all.ear, it will be necessary to configure it to update the local installation filepaths.
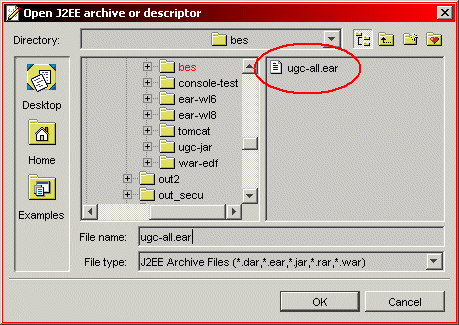
To do this, the simplest solution is to use Borland Deployment Descriptor Editor (DDEditor).
- Execute ddeditor and open ugc-all.ear
- Select the resource adaptor module (rar) in the enterprise application archive (ear)
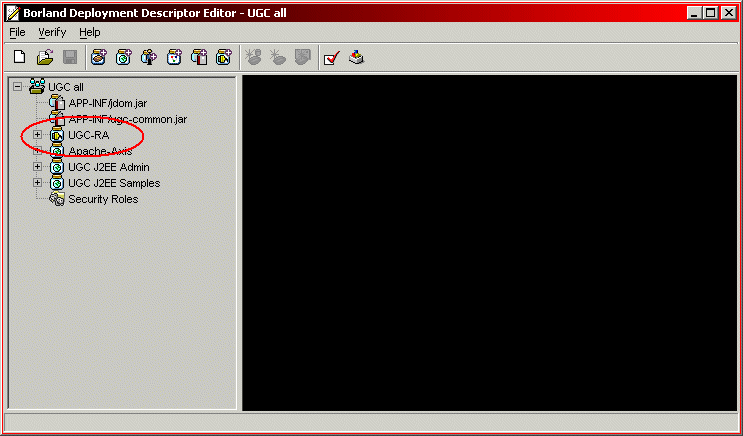
- Select the config properties tag in the resource adaptor module
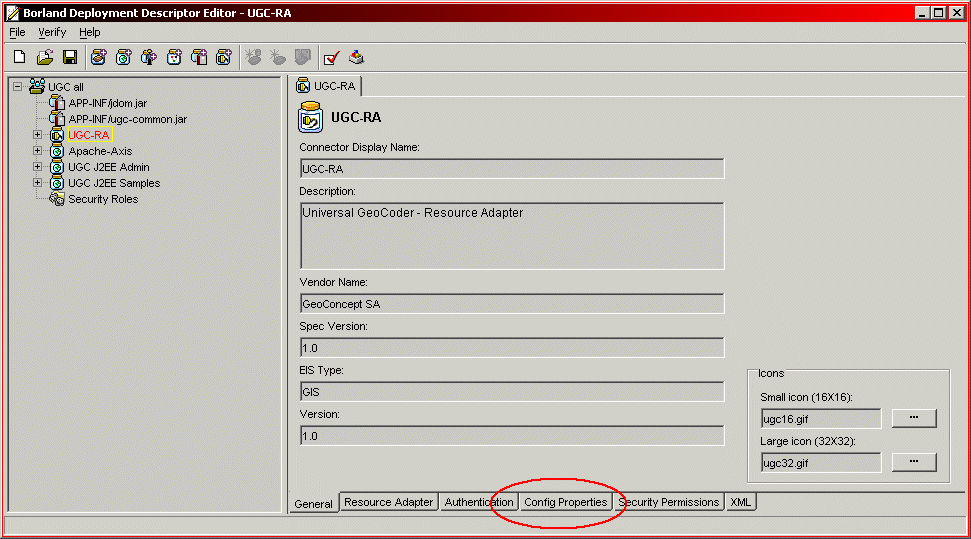
- Indicate the installation directory for external files to the application server
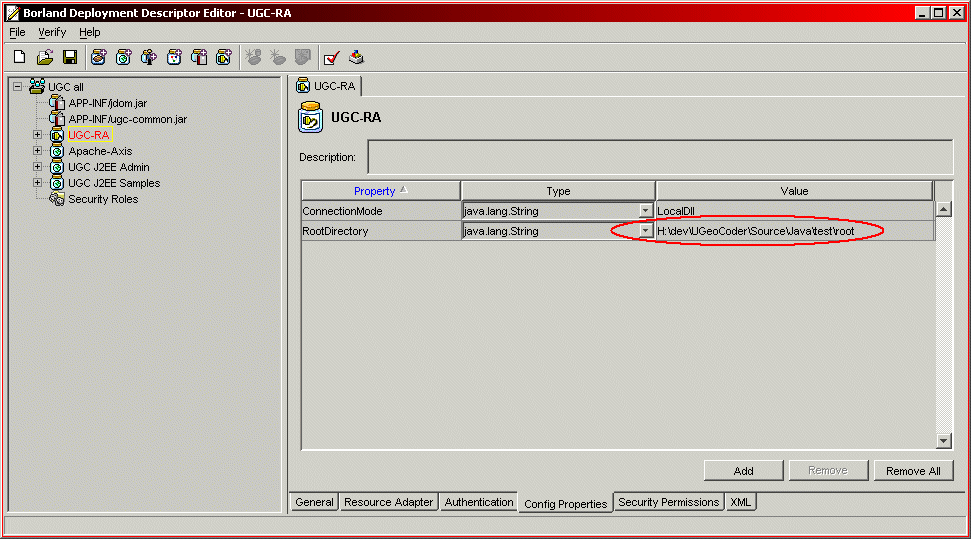
- Save any changes applied
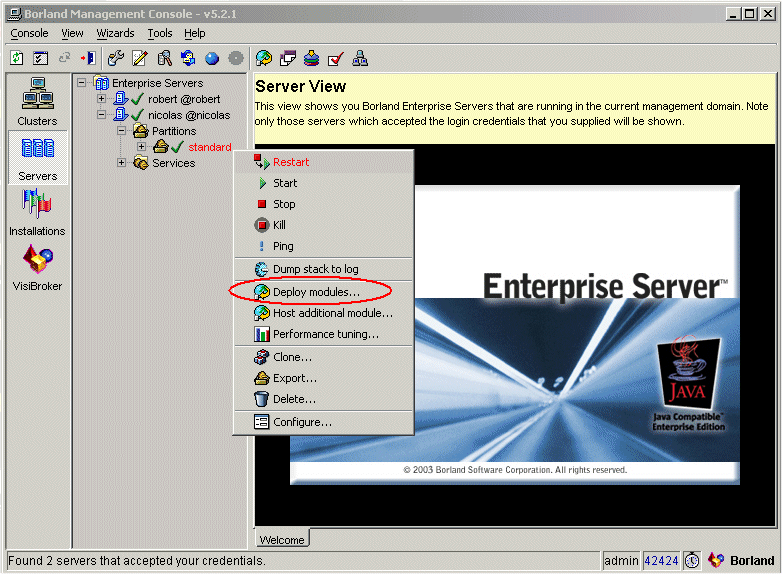
Deployment of the enterprise application (ugc-all.ear) in Borland Management Console
Select the partition on which you want to deploy:
|
Warning |
|---|---|
|
VisiConnect must be enabled in the PartitionServices of the target partition. |
Apply a right-click to the partition and select 'Deploy modules …'
Select the ugc-all.ear file that you have modified in the previous step and validate:

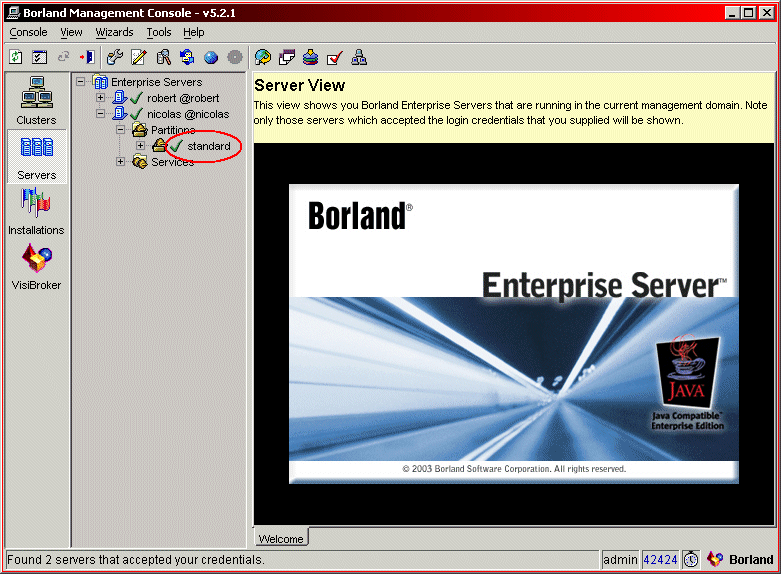
Select finish and the deployment terminates:
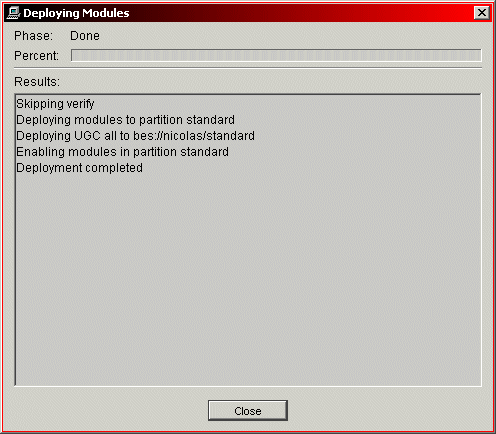
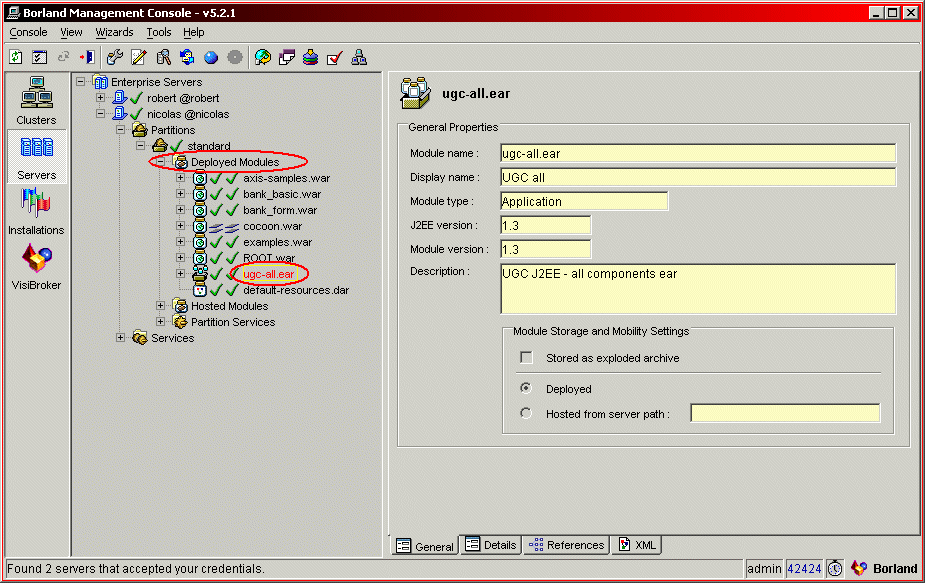
The ugc-all application appears now in the list of modules deployed for the selected partition:
The deployment environment described is IBM WebSphere Application Server version 8.5.
The resource adaptor (ugc.rar) and a series of optional publishing modules (ugc-admin.war, ugc-samples.war, ugc-axis-fusion.war, etc ) are deployed in the form of separate (standalone) modules.
ugc-admin is an optional module but it allows, among other things, validation of the correct deployment of the resource adaptor.
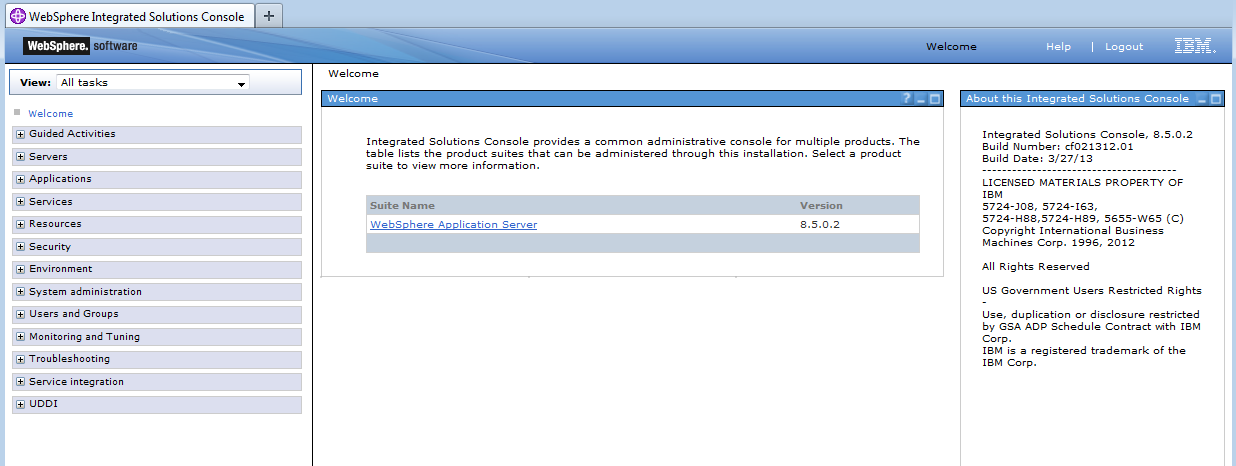
There are many ways to execute deployments in WebSphere Application Server (via scripting, or programming, via files of properties, via wsadmin, etc), here the deployment process described will be that of WebSphere integrated Solutions Console (also called the administrative console).
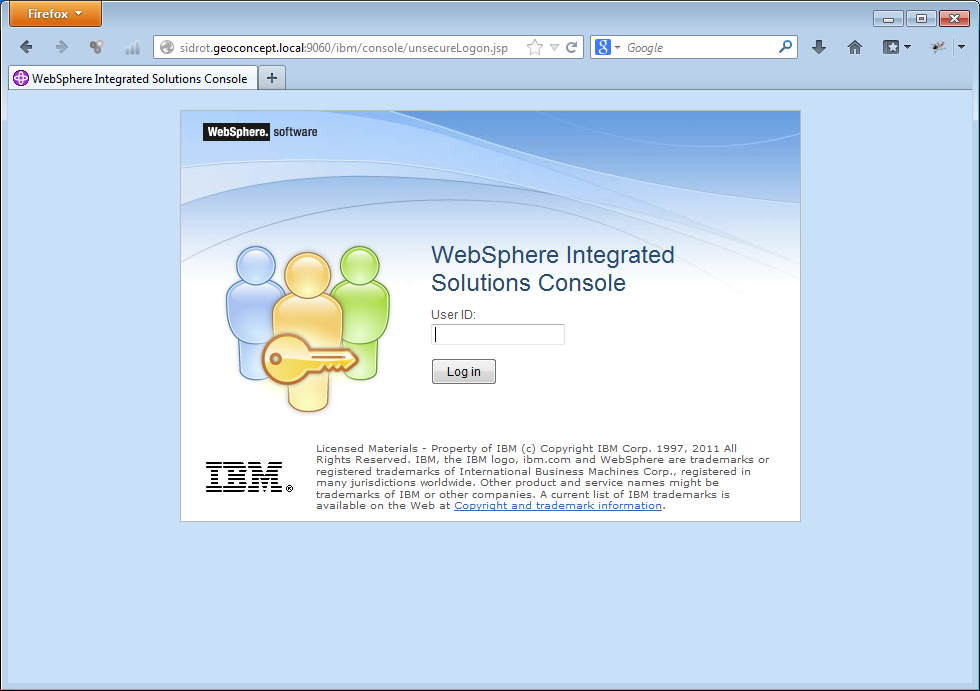
- Deployment of the resource adaptor (ugc.rar): log in to WebSphere Integrated Solutions Console
Go into Resources > Resource Adaptors > Resource adaptors (left-hand menu).
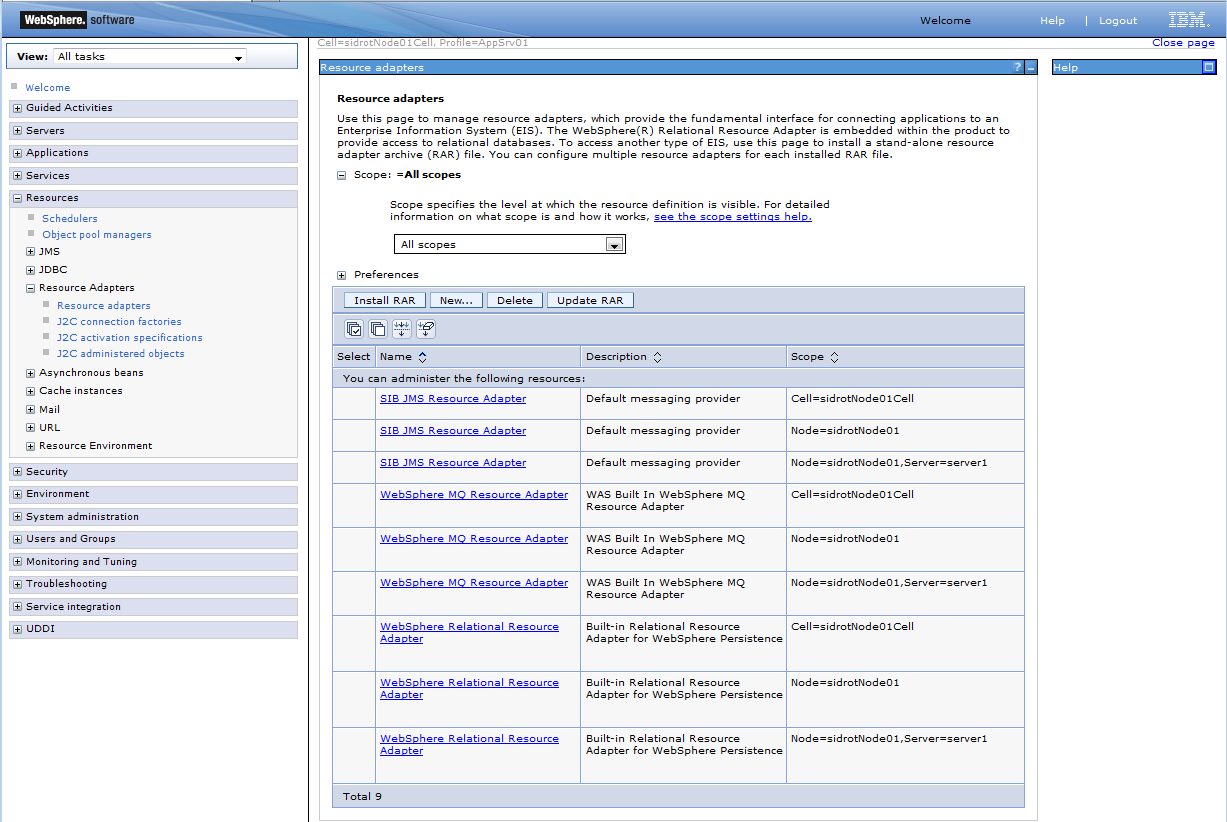
|
Warning |
|---|---|
|
In our case, Preferences / "show built-in resources" is checked (it is for this reason that one sees built-in adaptors). |
Click on "Install RAR" and select the "ugc.rar" file located in the sub-directory websphere/standalone/ra/deploy of the deliverable

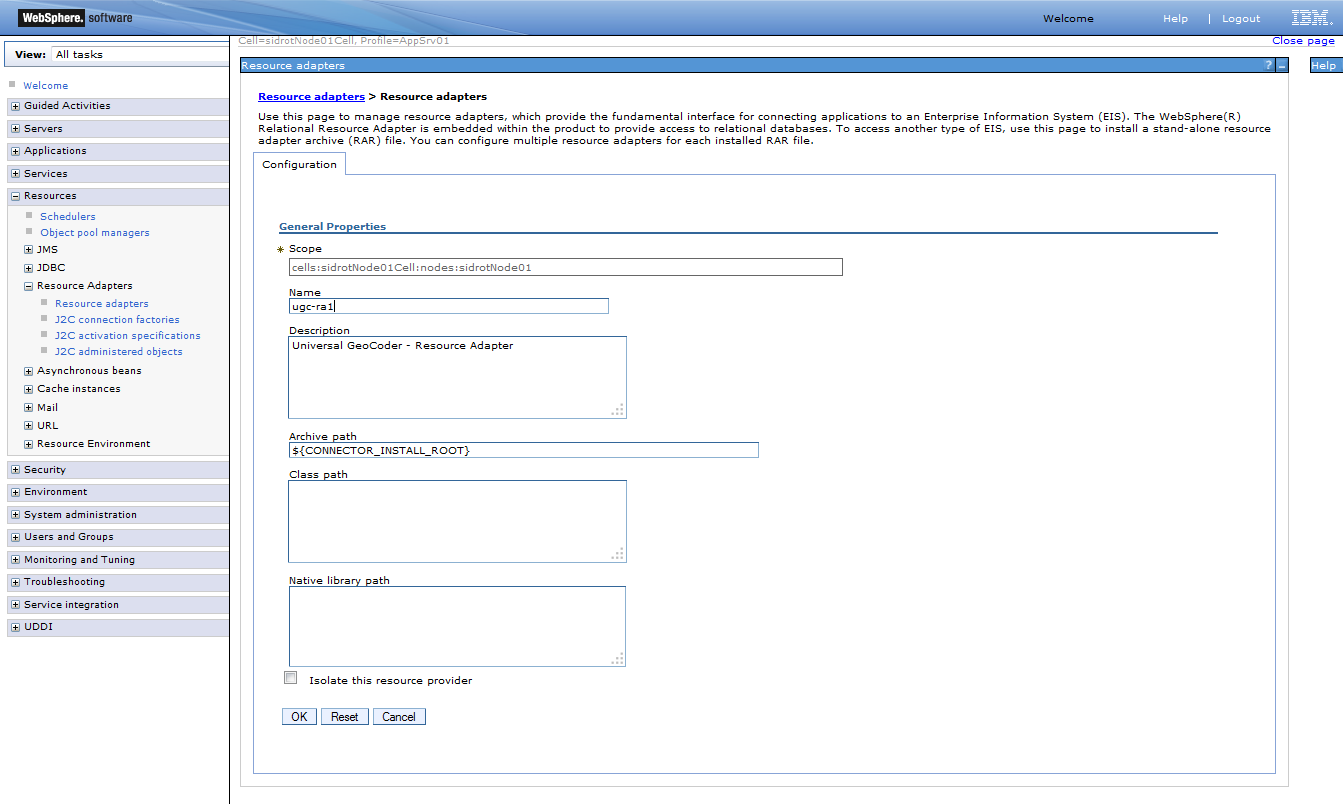
Then 'next' ; in the 'name' field, replace geoconcept/ugc/default with ugc-ra1 and then validate.
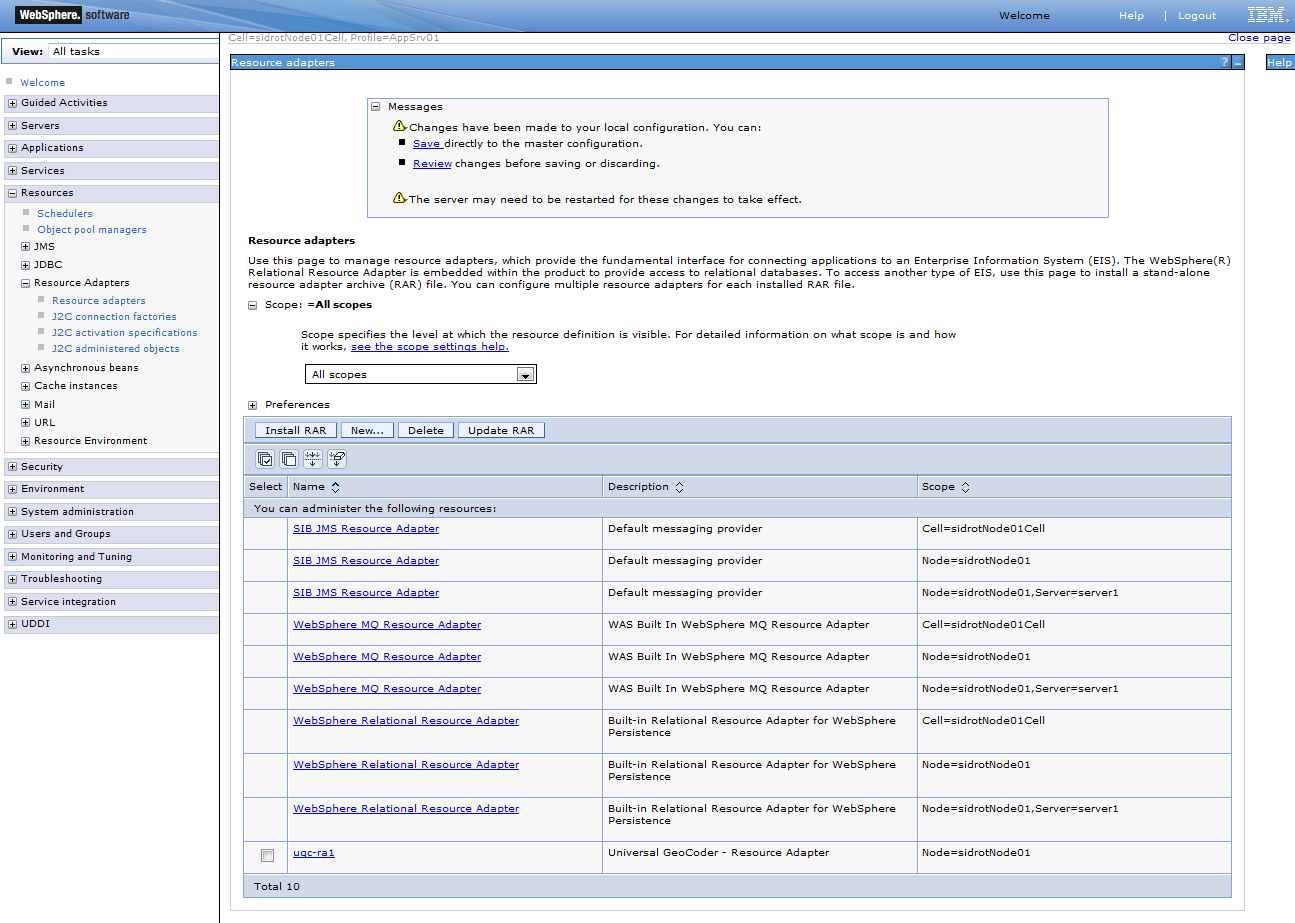
ugc-ral appears from then on in the list of resource adaptors deployed, click on it in the list
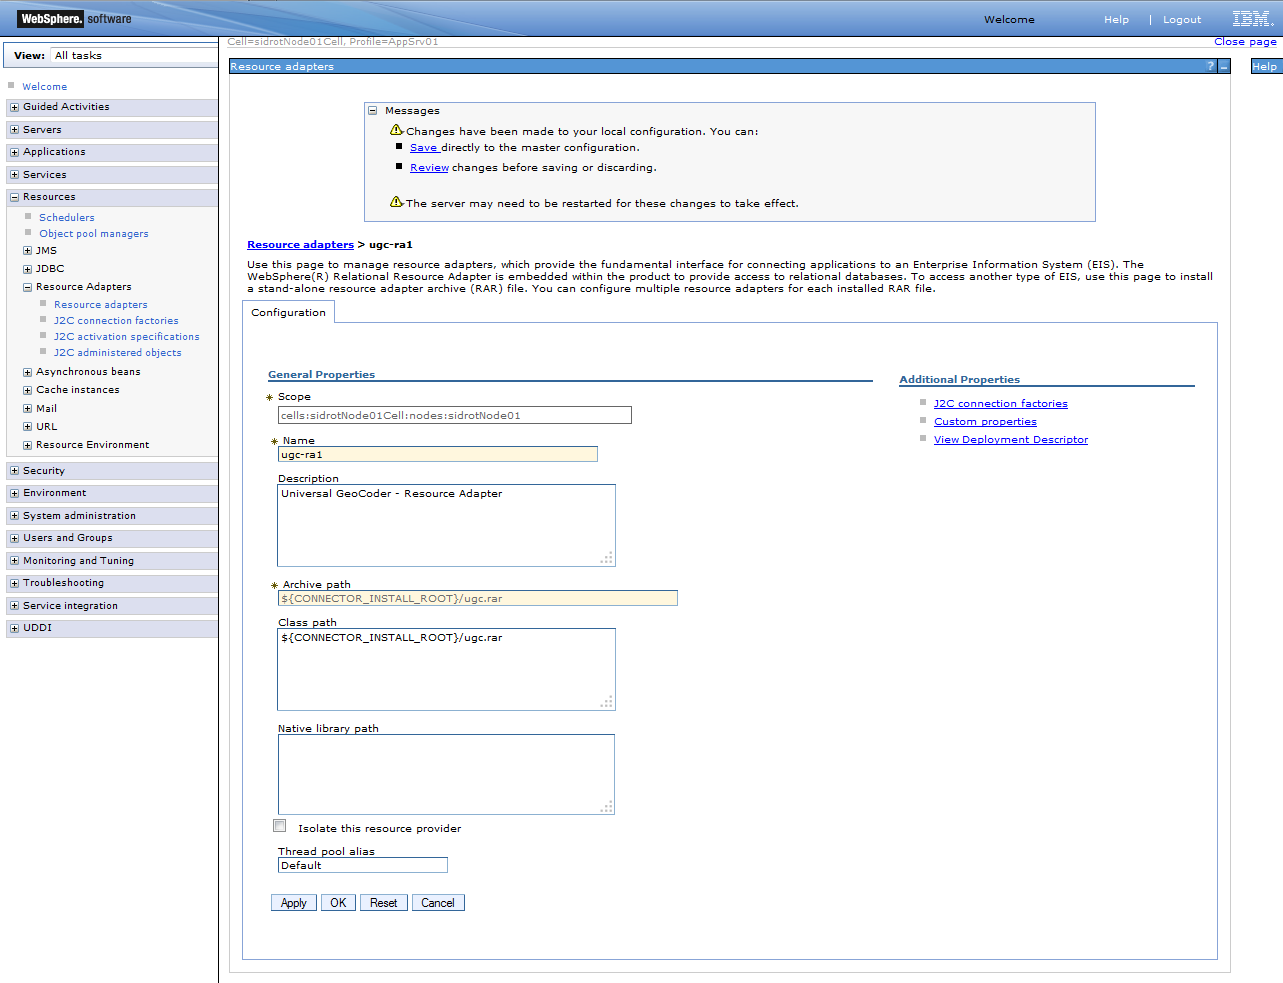
In the column headed Additional properties (on the right) click on "J2C factories connection"
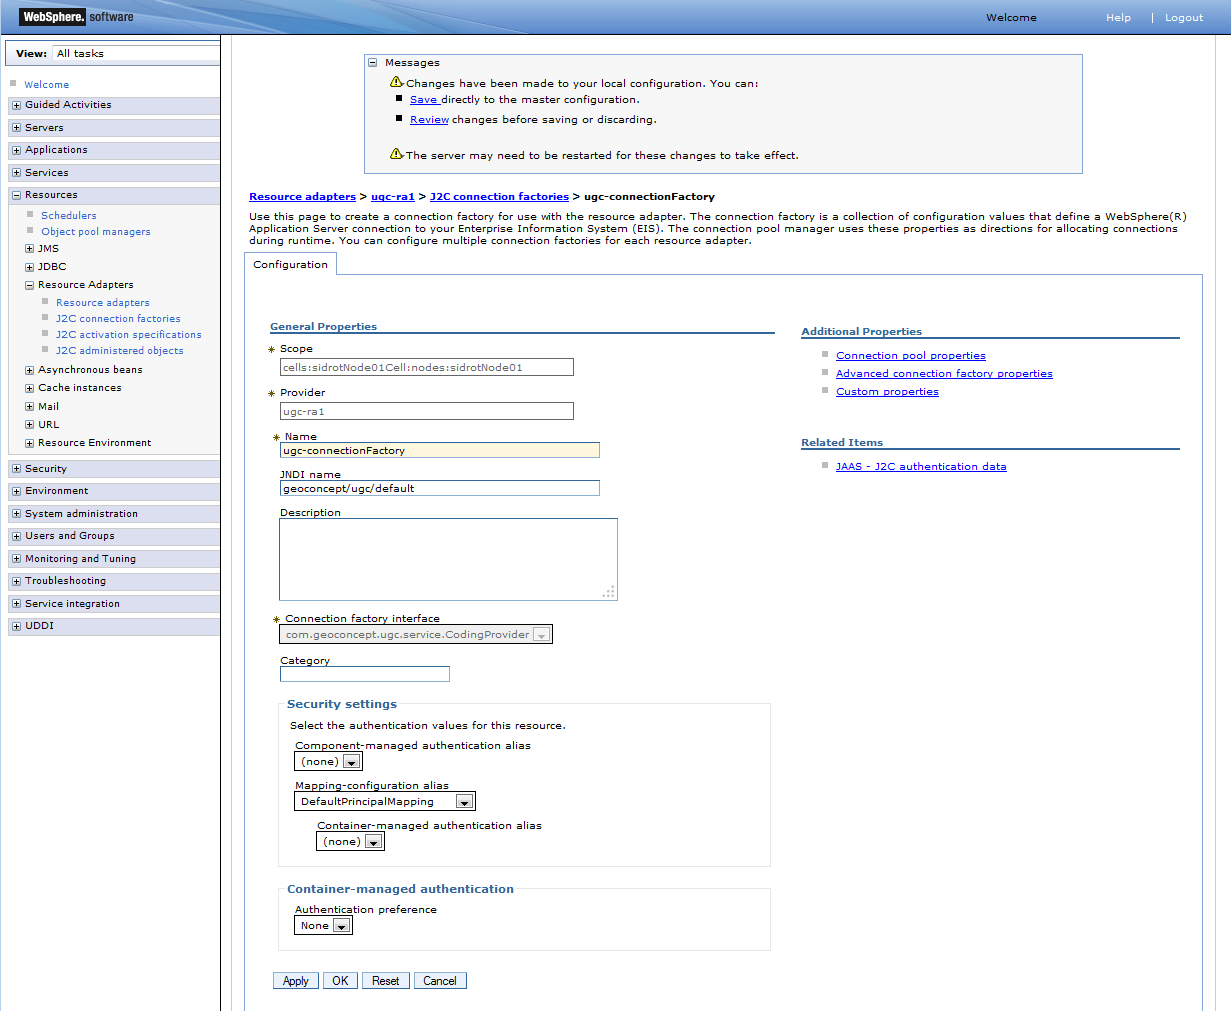
In the Name file, enter ugc-connectionFactory, and in the JNDI name field, enter geoconcept/ugc/default, then “Apply”. In the Additional properties column (on the right), click on Custom properties.
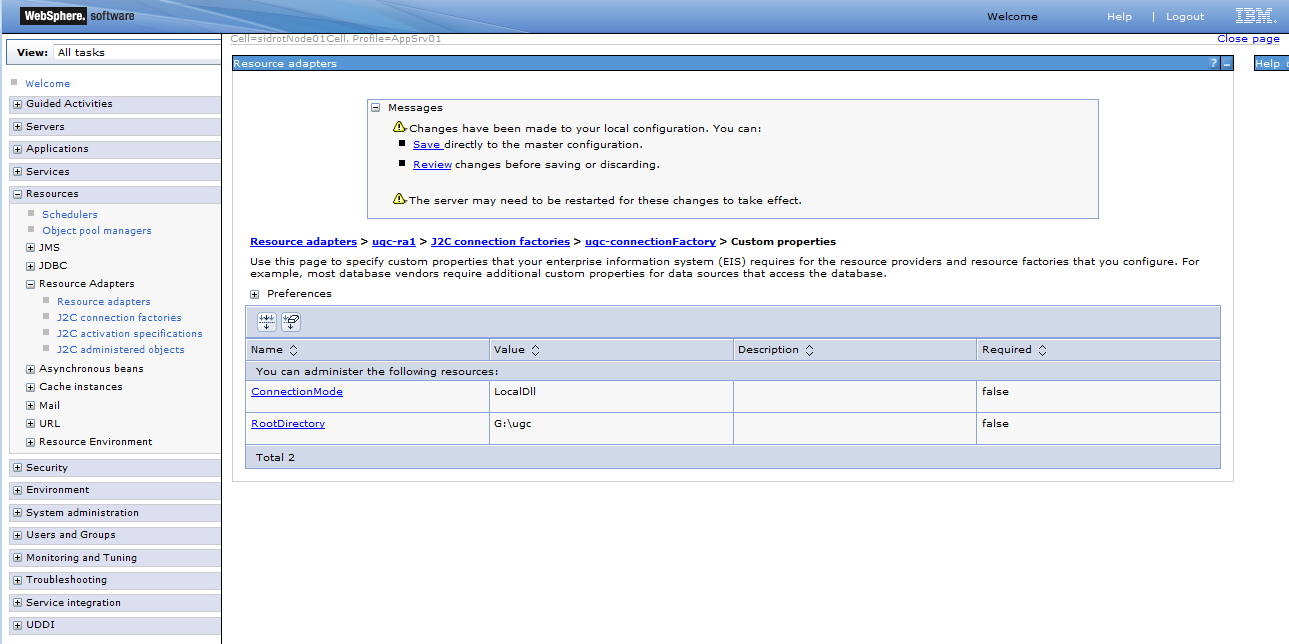
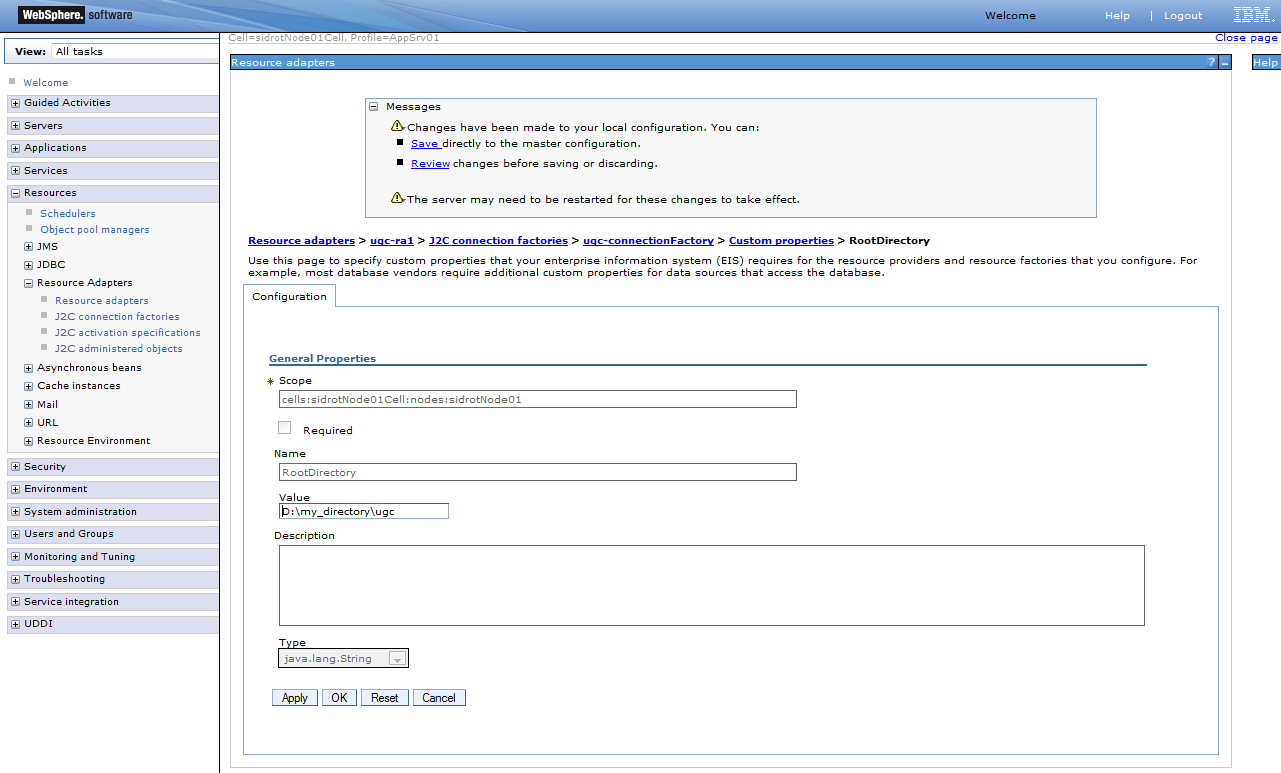
Edit the value of RootDirectory to give it the directory in which the external ugc files are, and then validate.
Save (Save directly to the master configuration)
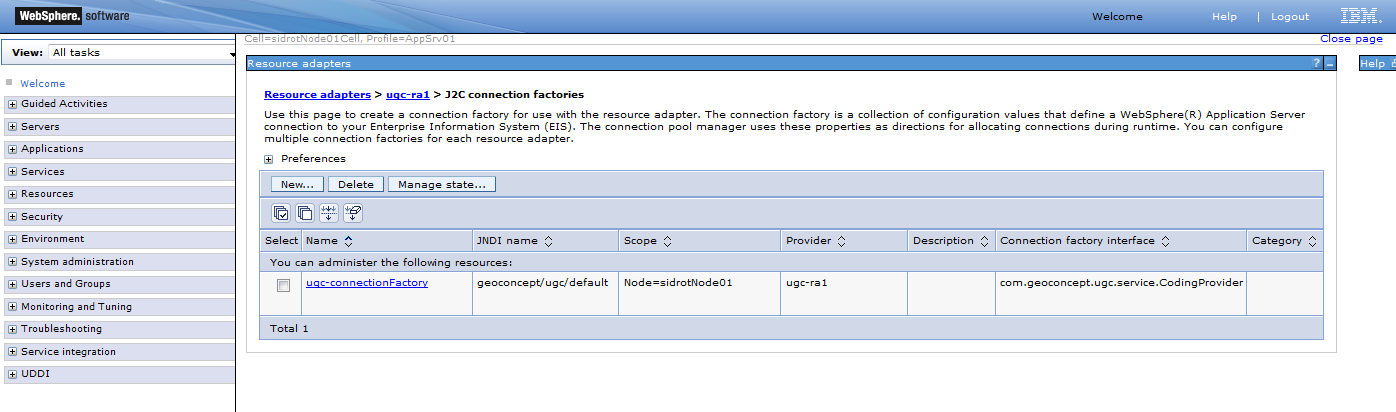
The factory connection is now deployed.
- Deployment of an optional module: we are now going to deploy an optional module supplied as standard, in this case the webapp ugc-admin (a war) that will consume the services of the resource adaptor.
The principle is the same as for any module (supplied or developed specifically) consuming the services of the resource adaptor.
In addition ugc-admin enables validation of the deployment of the resource adaptor.
In the menu on the left-hand side, go into Applications > New Application

Choose New Enterprise Application.

Click on browse and select the ugc-admin.war file located in the websphere/standalone/webapps sub-directory of the deliverable and then click on Next.
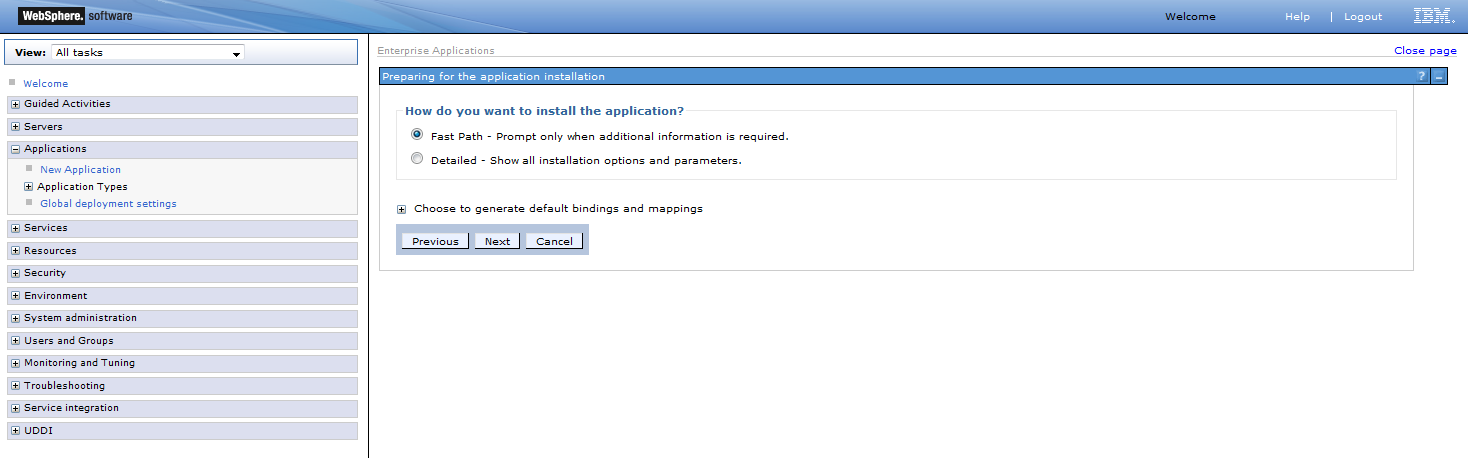
Leave fastpath by default and click on Next.
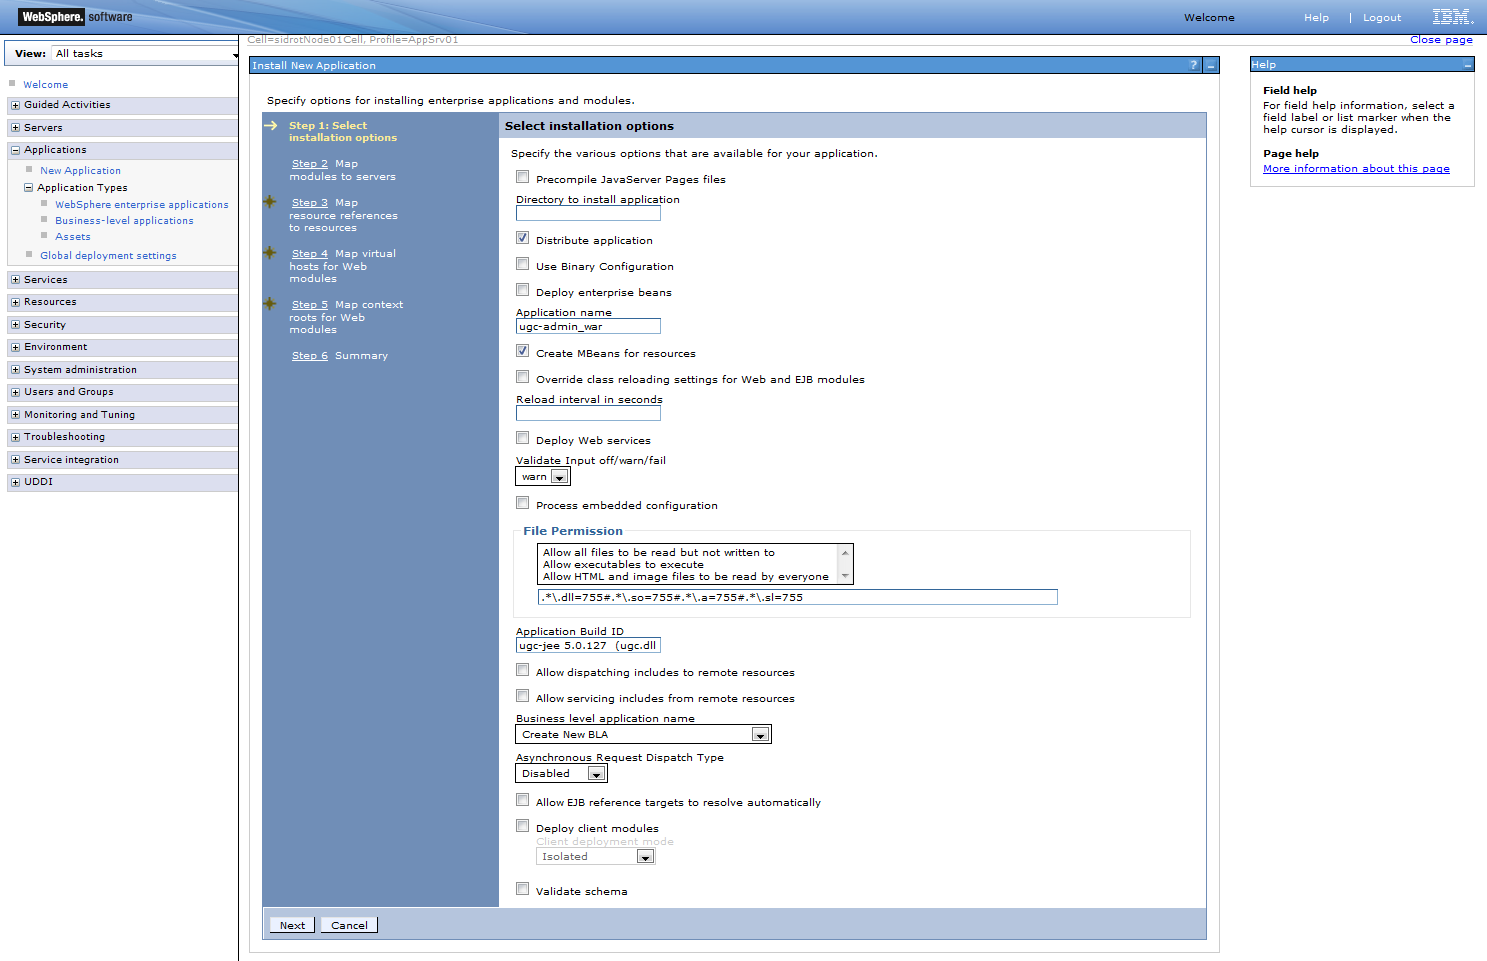
Step 1: leave everything on Default, then click on Next.
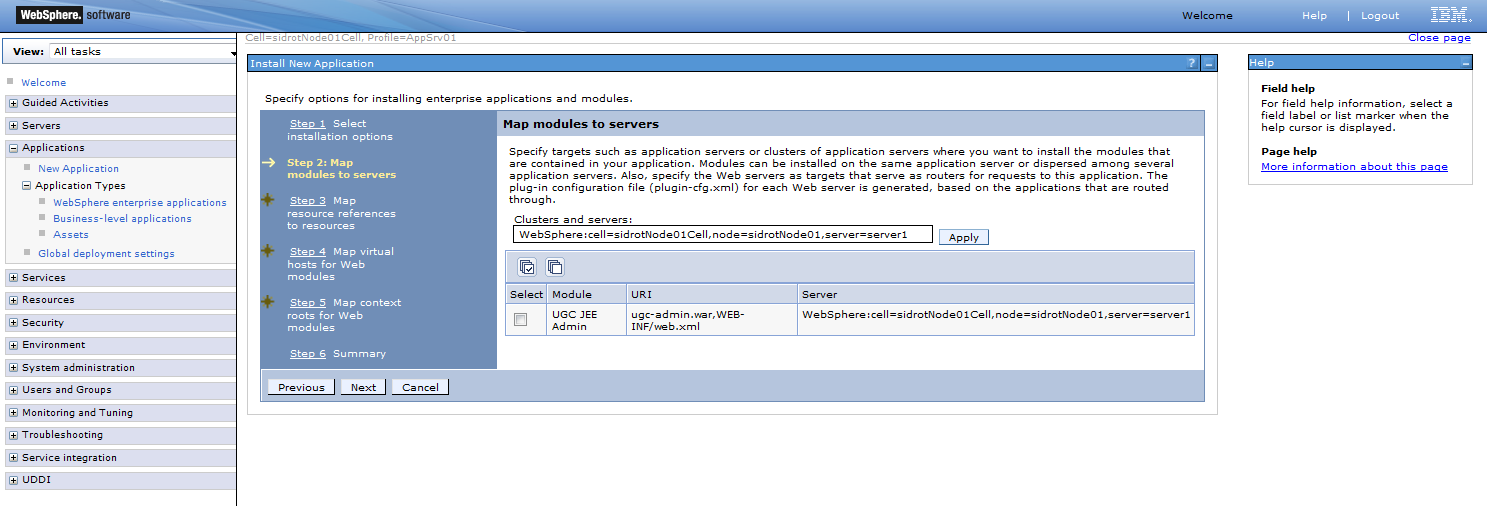
Step 2: leave everything on Default, then click on Next.
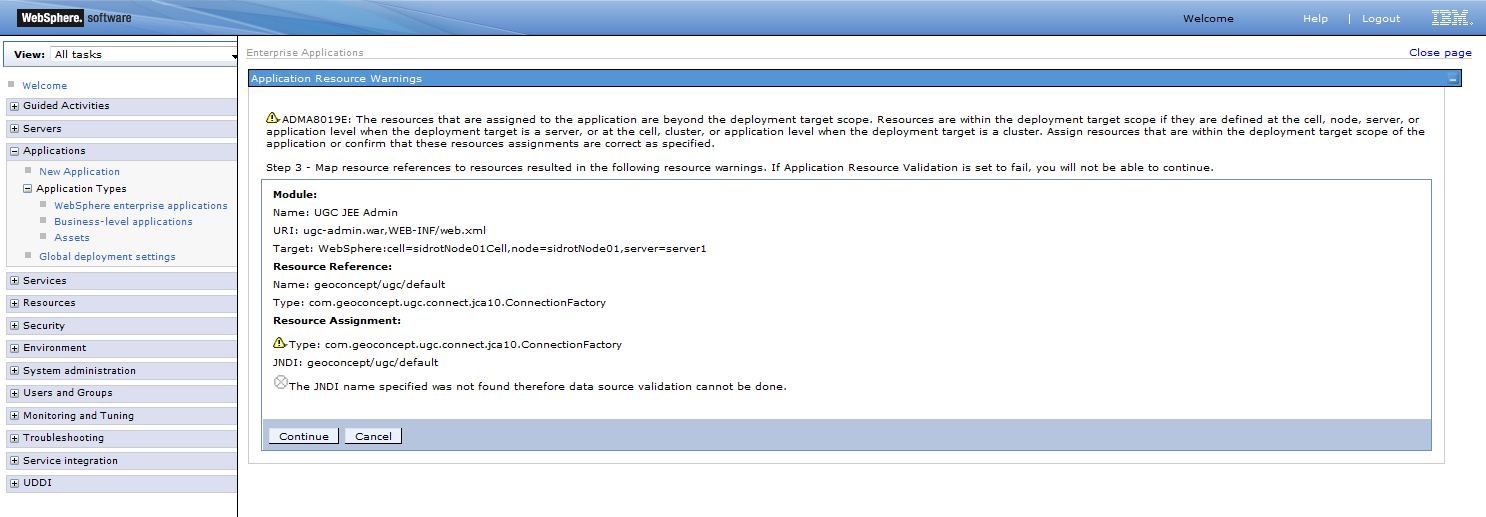
Step 3: enter geoconcept/ugc/default in Target Resource JNDI Name.
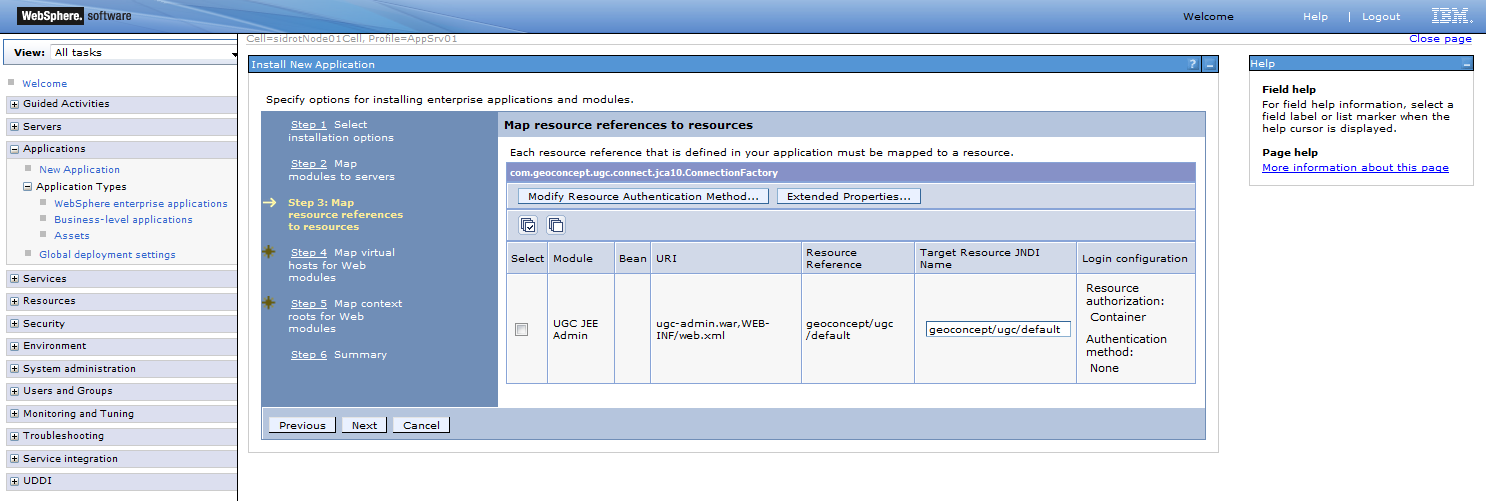
A warning is indicated, then click on 'continue'.
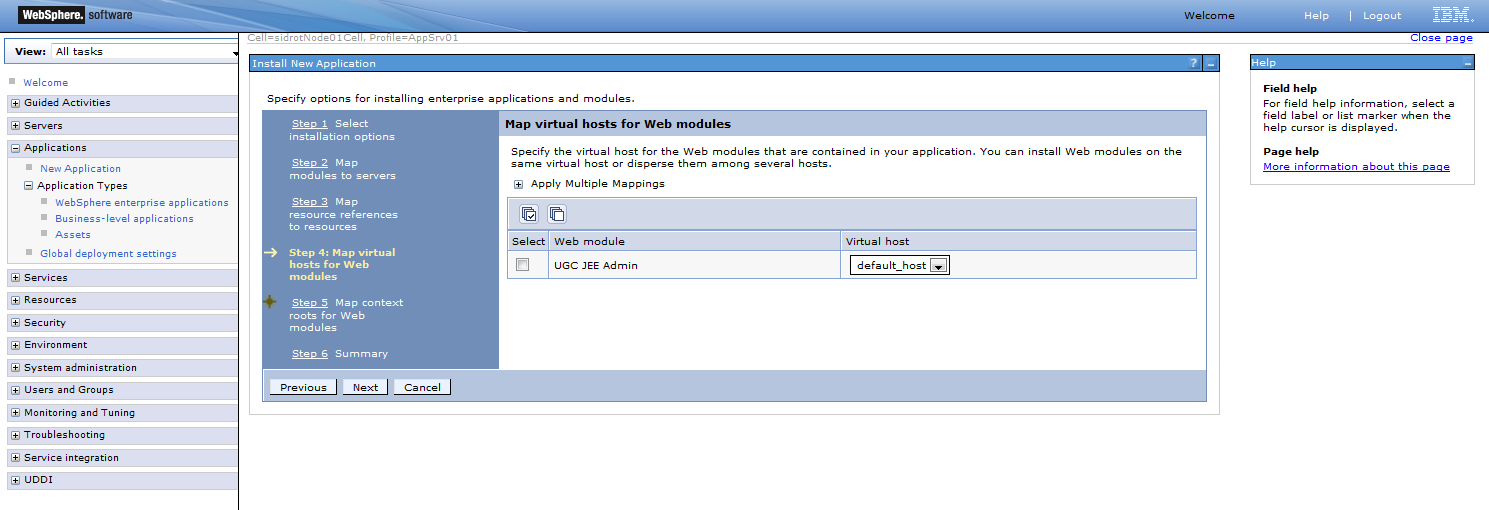
Step 4: leave everything on Default, and then click on Next.
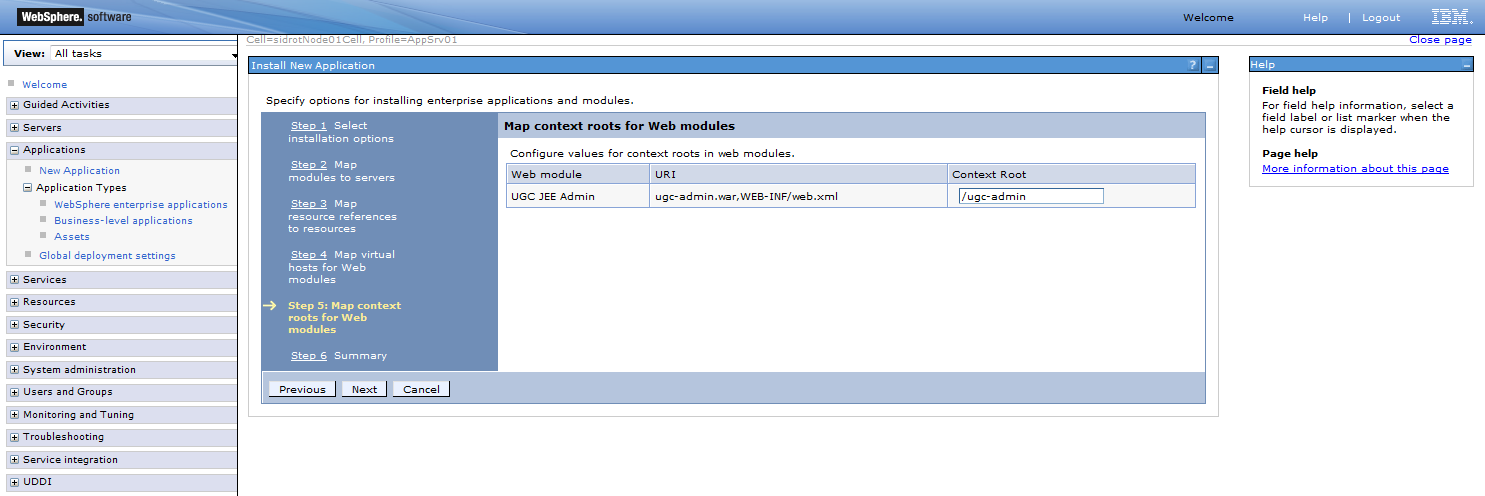
Step 5: enter the root / ugc-admin context (it proposes / by default)
Step 6: summary (validate with Finish)
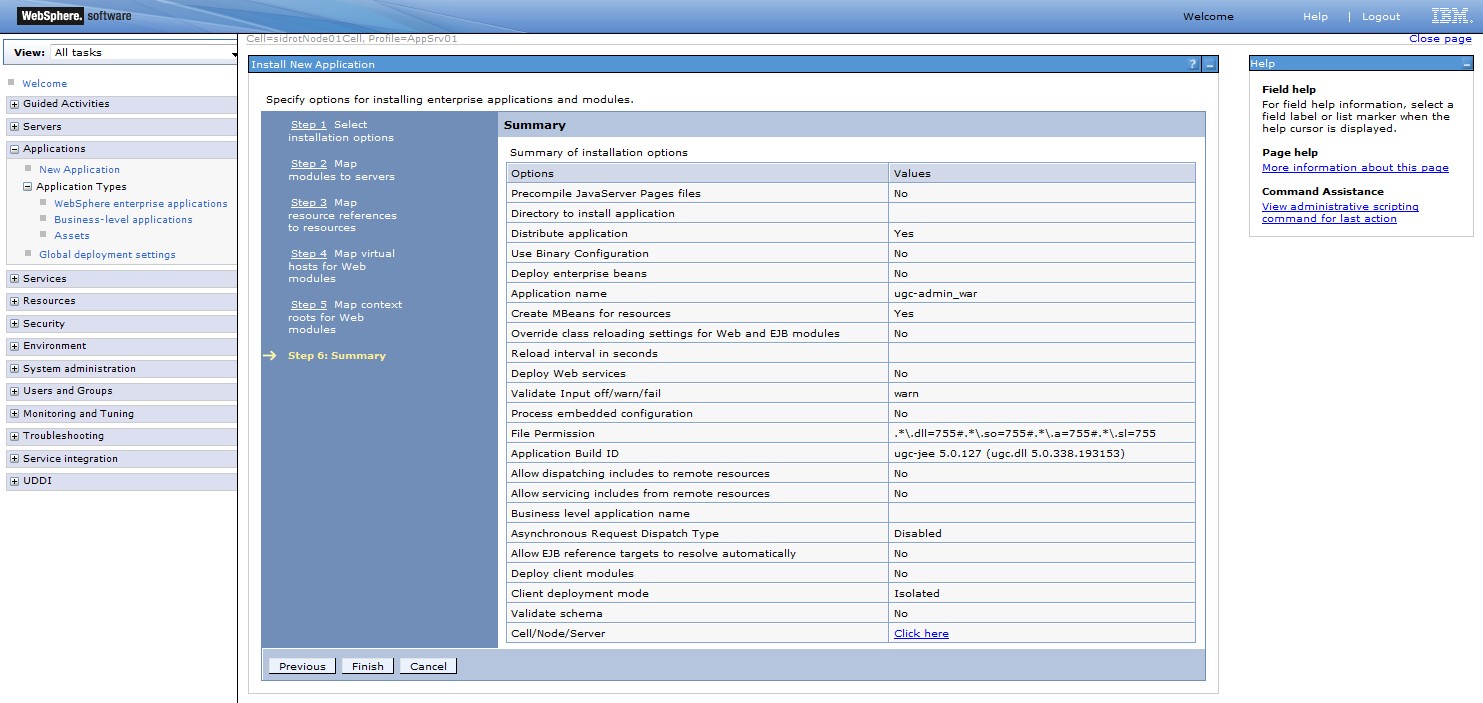
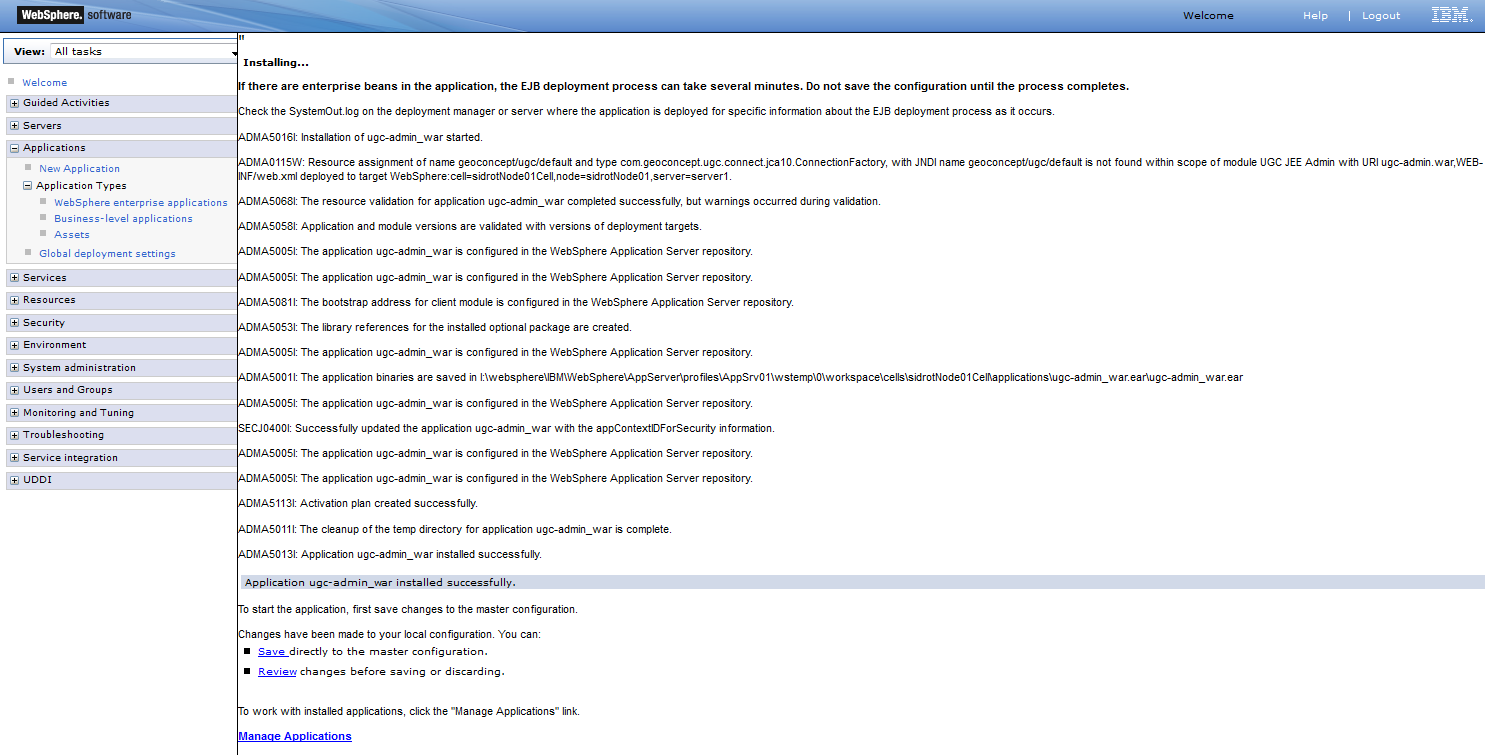
The console presents the status of the deployment and indicates Application ugc-admin_war installed successfully
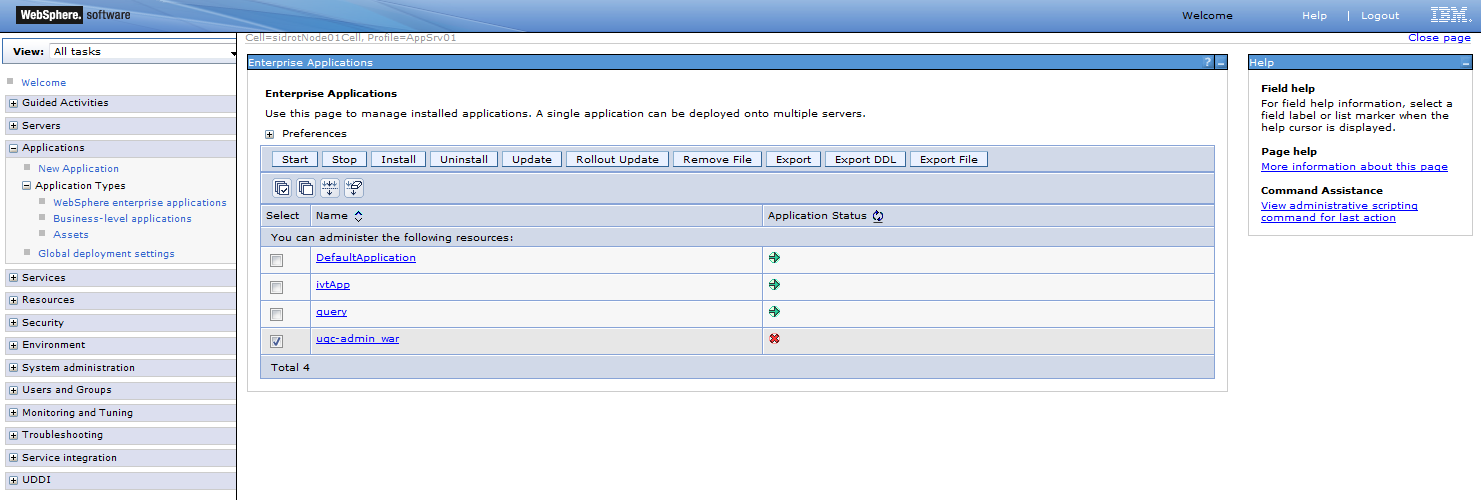
Start-up the webapp (check ugc-admin.war and click on Start)
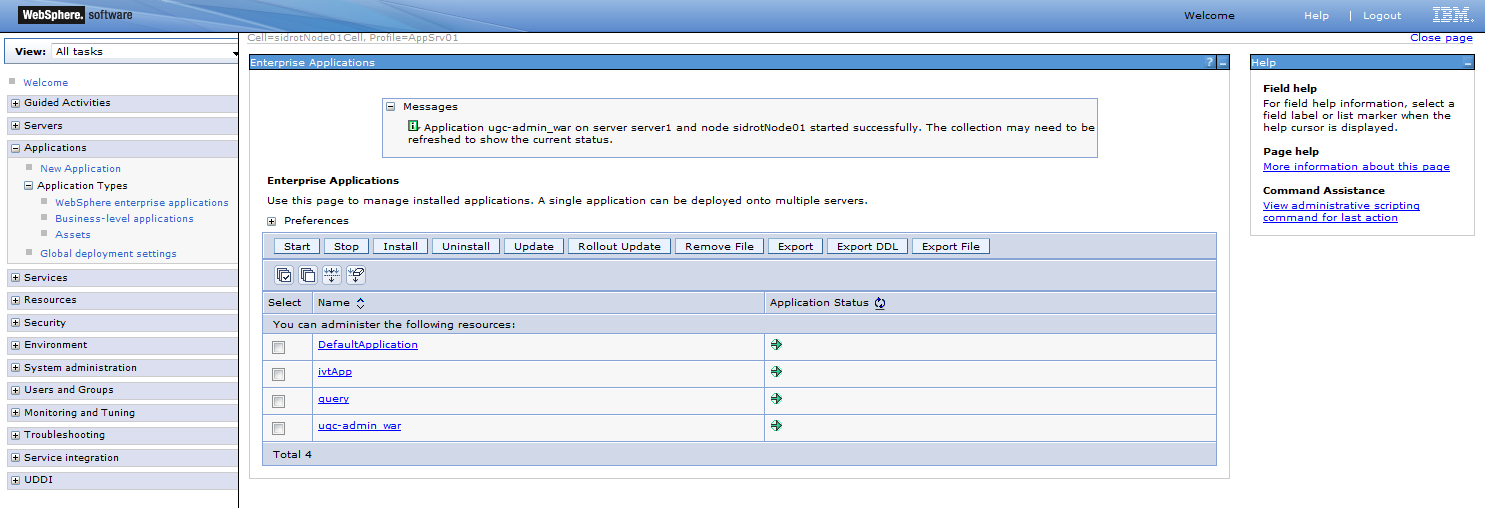
The console indicates "ugc-admin_war on server server1 and node sidrotNode01 started successfully. The collection may need to be refreshed to show the current status."
- Verification of the deployment with ugc-admin
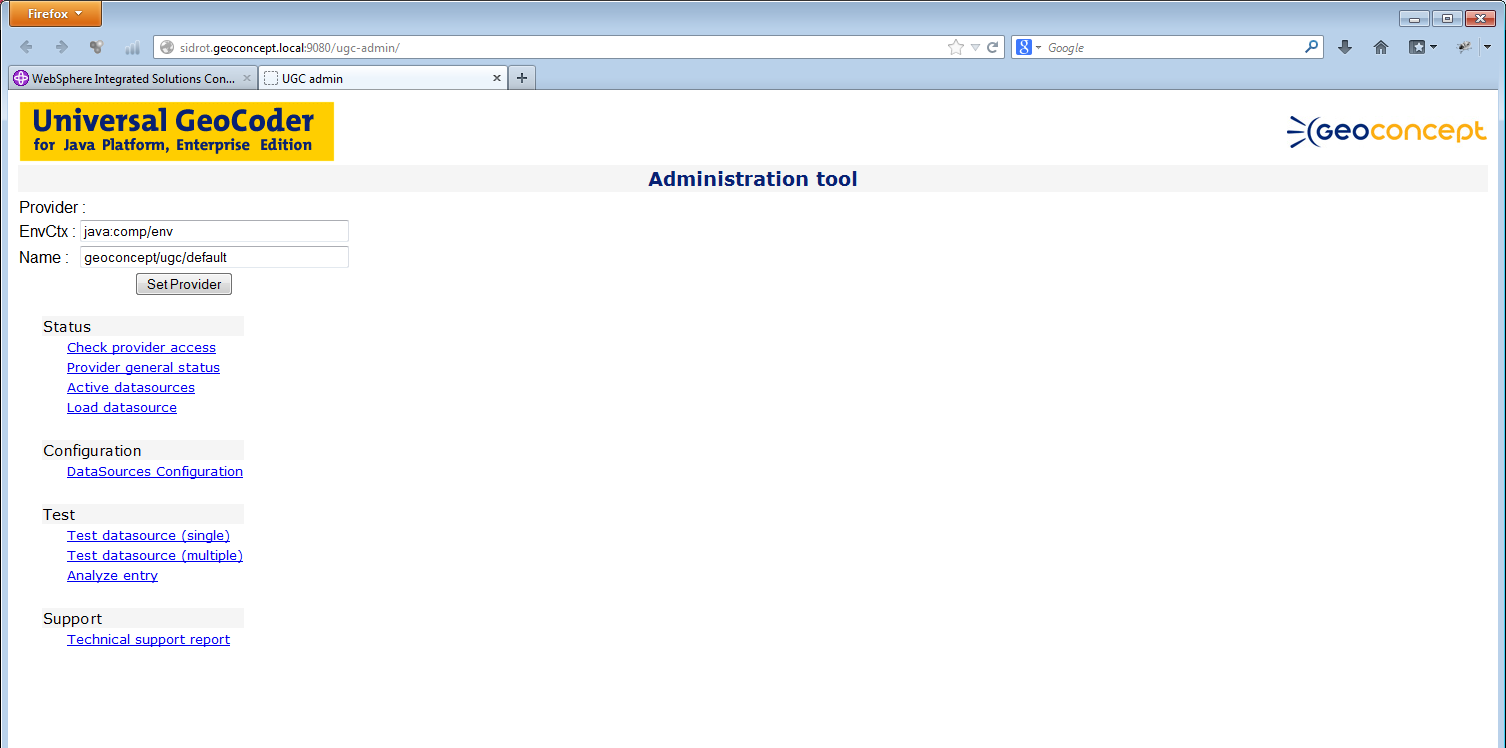
Click on Check provider access
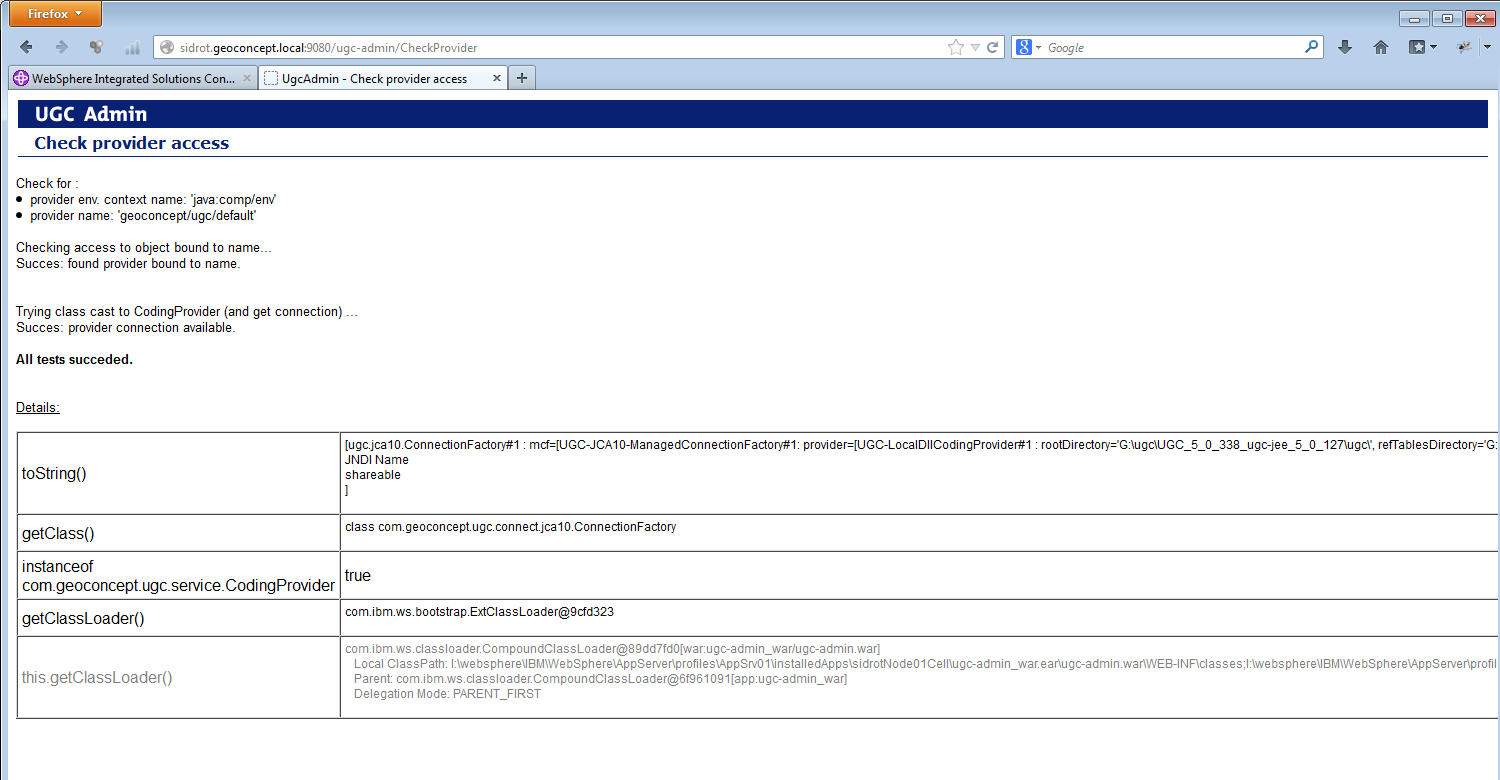
The page must indicate All tests succeeded.
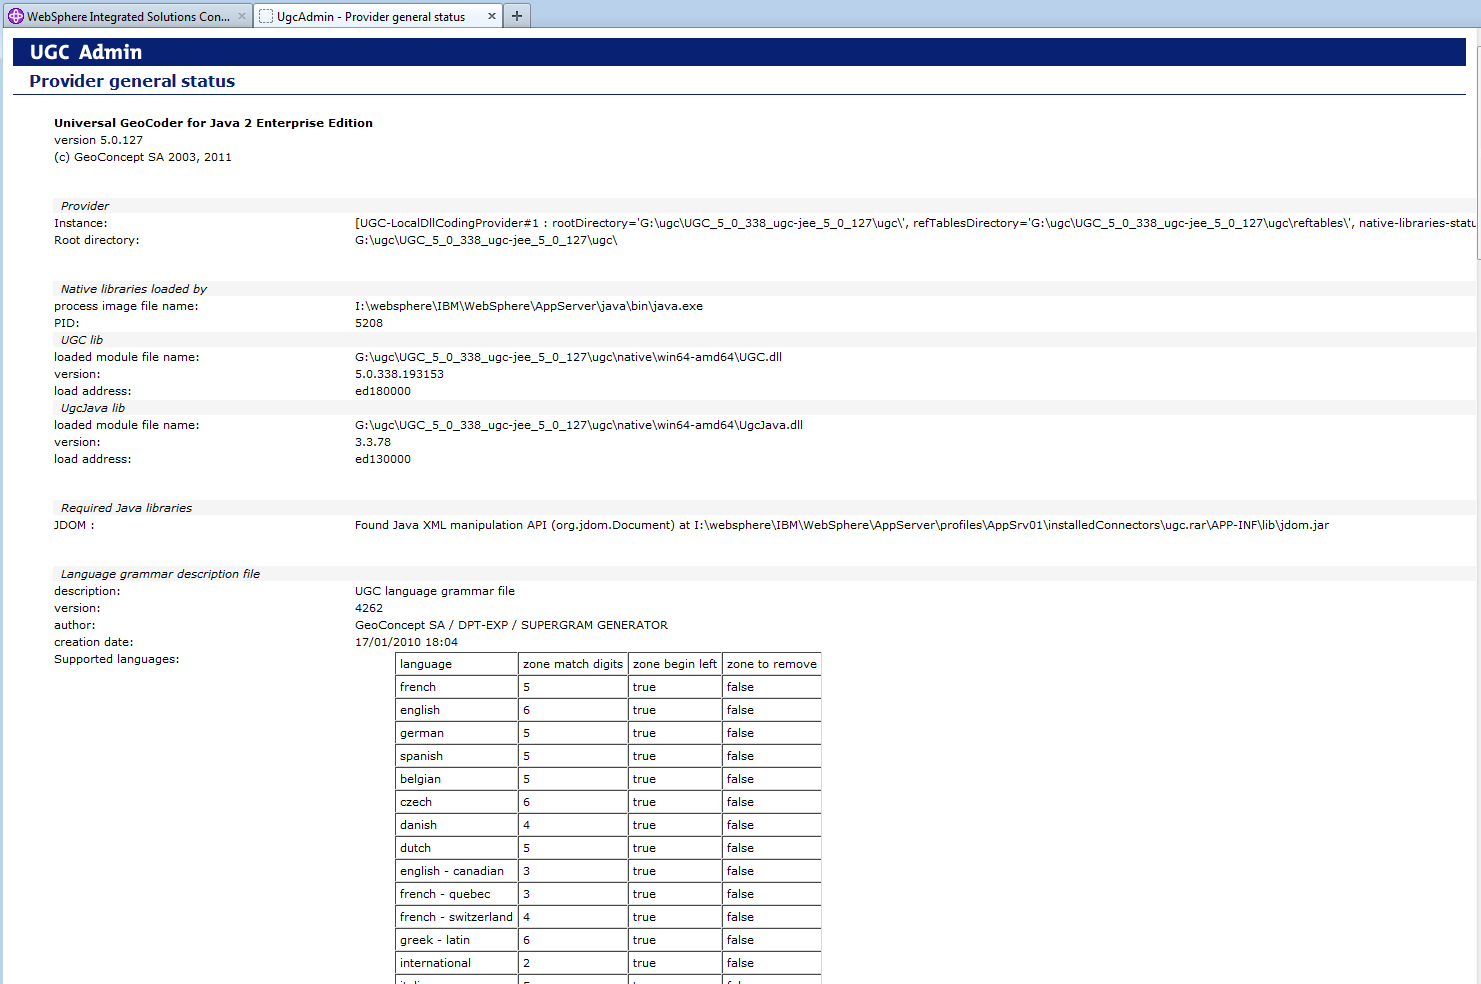
Return to the home page of ugc-admin and click on Provider general status
|
Warning |
|---|---|
|
The page shows versioning and runtime information for the provider instance and its environment |
Return to the ugc-admin home page and click on DataSources Configuration
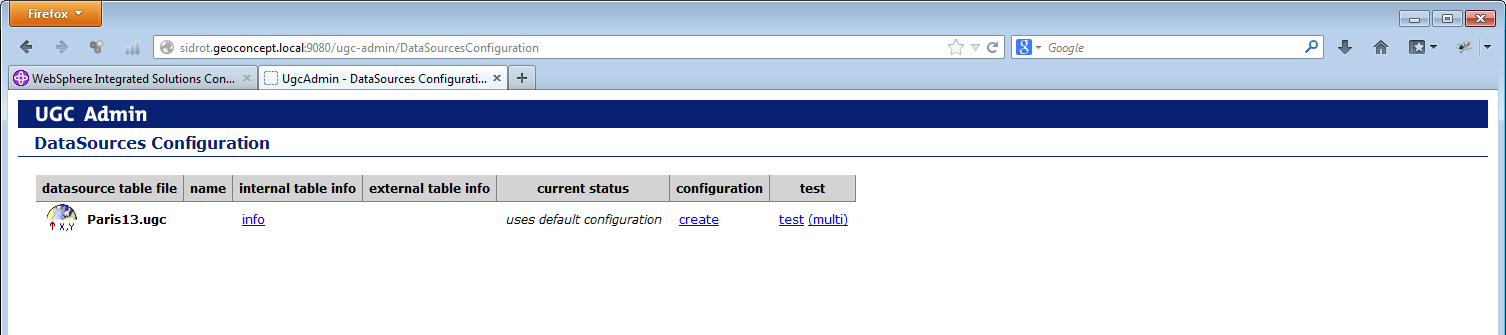
The page lists all available reference tables. Click on test for one of the reference tables listed. Click on Search
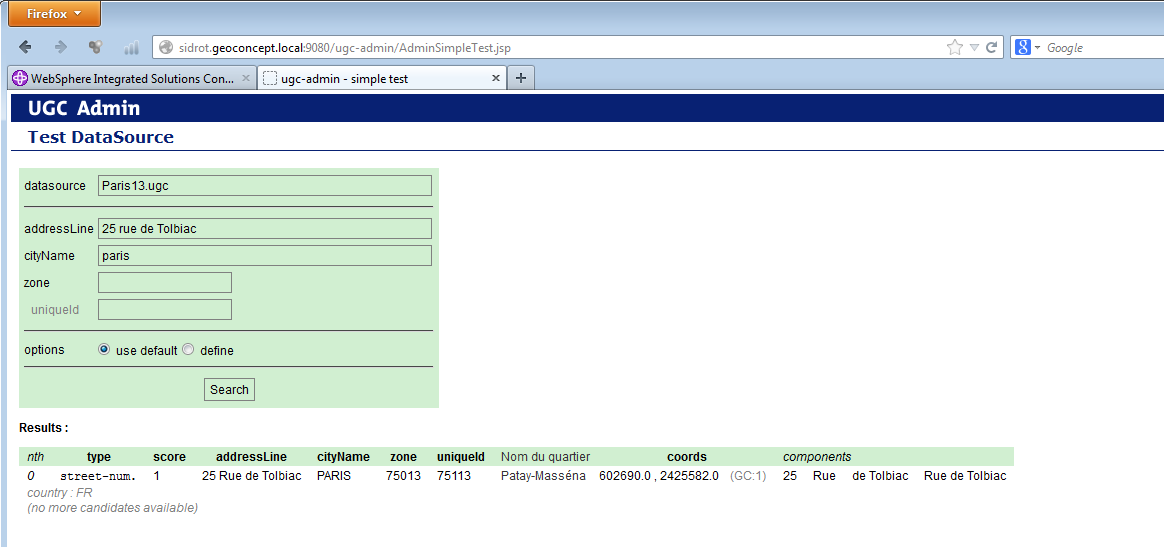
The page should display a correct result, and this validates the deployment
If the auto-complete web service supplied by Geoconcept Web is used, it will be necessary to dispose of and install the relevant reference files (simply copy the files into a directory).
Follow the steps described below to ensure correct functioning of the autocomplete web service:
-
In the
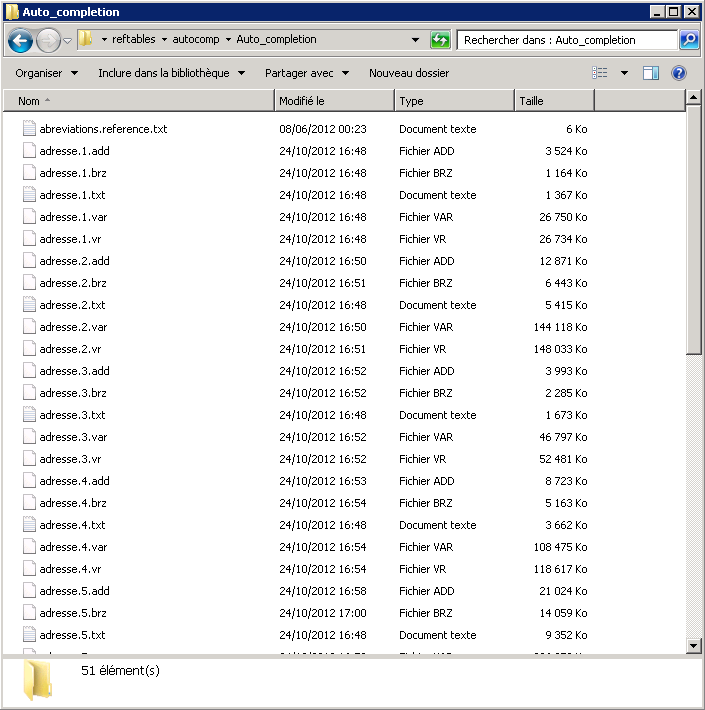
reftablesdirectory present in UGC, create an autocomp directory, - Copy the directory supplied by Geoconcept into this directory : the directory supplied by Geoconcept contains the reference files. You should have the following architecture :
The name of the directory in which the reference files are found is important. This name will be supplied in the parameters to be saved in the Geoconcept Webadministration (cf. LBS Platform Manual). Please refer to this manual for details of the parameters to set to ensure the autocomplete web service will operate.
|
Warning |
|---|---|
|
We strongly recommend that the UGC logs remain disabled during utilisation of the autocomplete web service. In effect, these logs are alimented each time a user query is run, and will become huge in size within minutes of a production type utilisation. In addition, performances will be much reduced when logs are activated. |
